G-Punch Orienteering
Version 2.1.3 (initial release on 2022-05-19)
Overview
This app allows you to run GPS-based Orienteering or Land Navigation courses!
It's meant to be used with a physical map and compass out in nature. Course data can be manually entered into the app via the settings, or if you have a newer model Garmin watch, downloaded from a web location using the free companion app GP Loader.
The app presents the user with MGRS, OSGB, OSI or ITM grid coordinates, latitude & longitude, or Orienteering clues, depending on the settings. The user has to navigate to the control checkpoints to complete the activity and win. (From this point forward in these instructions, virtual control checkpoints in the woods will be referred to as controls.)
When the user navigates to within a certain proximity of a control (15-40 m), the watch will beep/vibrate (depending on the device) and show an arrow pointing towards that control. The user must move closer (5-9 m) to the control in order to identify it, punch it, and begin the next leg. Depending upon the course, the user is alerted if they arrive at an incorrect point. After completing the activity, results are shown on the app and uploaded to Garmin Connect.
G-Punch supports classic (ordered), score-o (random order) as well as hybrid course formats like control boxes and butterfly loops. It also supports control score values, time limit, and penalties for finishing over the time limit. You can now change Precision level in the settings, and switch between Lap Pace & Heart Rate, and between Time of Day & Countdown Timer during navigation.
GPS-based Orienteering may be less precise than regular Orienteering, but we hope this app will inspire more people to experience Orienteering, improve map and compass skills, or just get outside and have some fun!
1.1 Step-By-Step Walkthrough
This app allows you to run your own pre-designed virtual GPS navigation courses. You must first configure the app for your particular course, by editing the Settings. (Skip ahead to the Settings section to see how to edit the settings.)
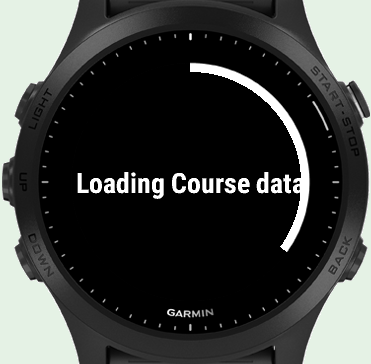
After adjusting the settings, when you first run the app it will begin loading the course from points in the settings.

On the first start up screen, the checkboxes indicate steps required to initiate the program. First it loads the course data, then it waits for GPS Signal. After the course is loaded and GPS Signal has been received, it will let you move to the second start up screen. NOTE: If the GPS box does not check, it means the GPS Signal from GPS satellites is not good enough to determine your location. If this happens, try running the app outdoors, or move out from under heavy walls or objects.
On the second start up screen, course details are shown in green.
Press START/STOP to toggle between the first and second start up screens. When on the second start up screen, press LAP/BACK to continue into Navigation Mode.
Once you enter Navigation Mode, the device will remain in navigation mode until you complete the course. If you wish to exit the app before then, press MENU (on some devices press and hold the UP button), and select 'Exit'.
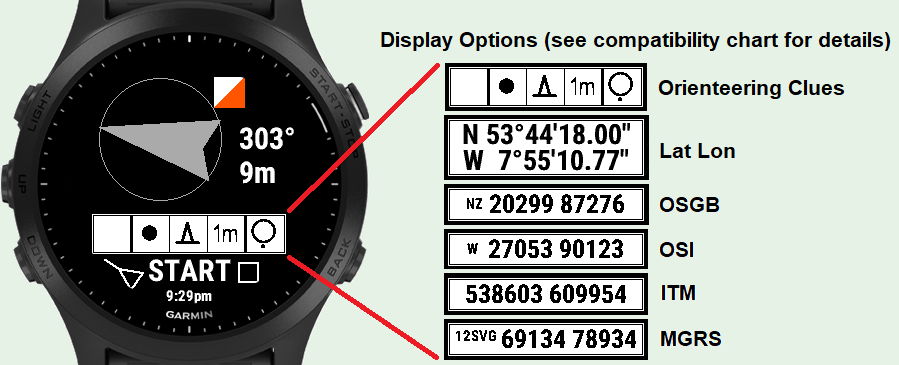
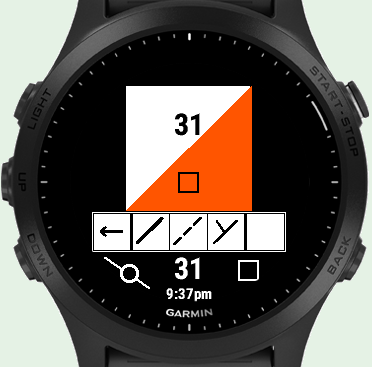
While in Navigation Mode, the white box shows the clue or grid coordinate that you want to navigate to. You can set this to display Orienteering Clues, Latitude & Longitude in Degrees Minutes Seconds (Lat Lon), Ordinance Survey National Grid / British National Grid (OSGB), Irish Grid Reference Sytem (OSI), Irish Transverse Mercator (ITM), or Military Grid Reference System (MGRS). See Compatible Device List for details on what options are available for your device. To change from one option to another, adjust the settings and restart the app (cannot be changed during activity).
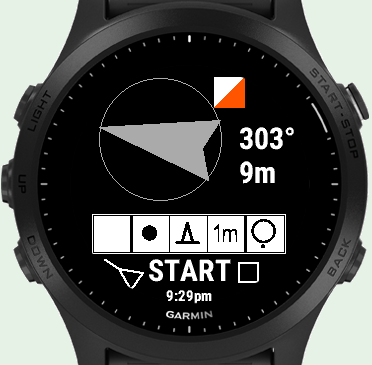
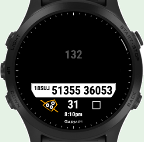
When you first enter Navigation Mode, you will see an arrow and a small control. The arrow will point you towards the Start control (in this case named "START"), no matter how far away it is. Once you punch the Start control, the activity will start recording your movement, and the timer will begin.
After punching the Start control, the arrow and small control will only reappear once you get close to another control. It may help to think of the arrow and small control as an indicator that you can see a control from your current location, but that you need to get closer to identify which control it is.
When you get close enough to see the arrow and small control, the watch will emit a beep and/or vibrate (depending upon the capabilities of the watch). Press LAP/BACK to silence the alert.
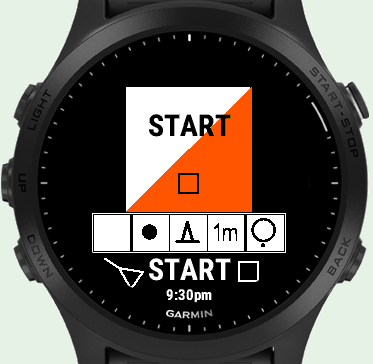
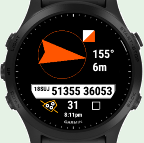
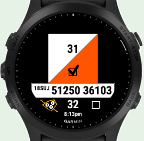
When you arrive at the control, it will show a large control and the name of the control. If the control is the correct one, it will show an empty square beneath the name.
Press LAP/BACK to punch it and record your arrival.
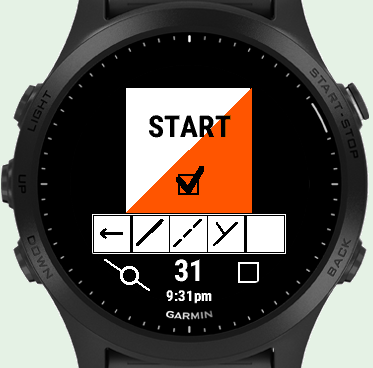
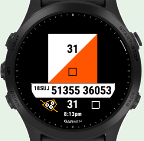
After punching the control, a check will appear in the box on the icon, and the clue and lower half will automatically update to the next control "31".
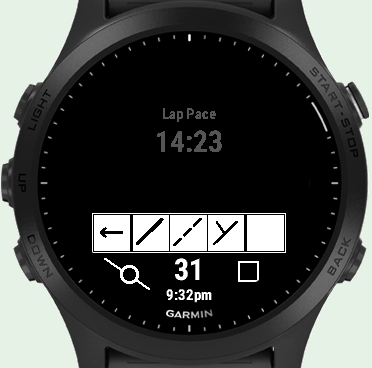
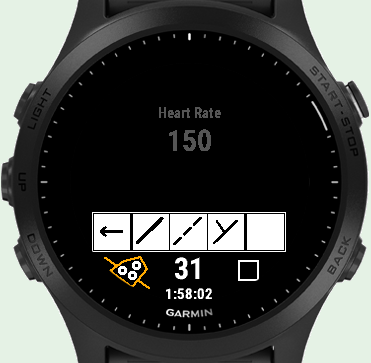
If no controls are nearby, Lap Pace or Heart Rate is shown in the upper area. Press START/STOP to switch between the two.
At the bottom of the display is the Time of Day or Countdown Timer. Press START/STOP to switch between the two.
Press UP and DOWN to scroll through other controls, if the course allows it. Compare the icons at the bottom left of both screens.

Ordered (Classic) Controls must be navigated to in order. You cannot scroll to the next control until you punch the current control.

Random-Order (Score-O) Controls can be navigated to in any order. You can scroll to the next control before punching the current control.
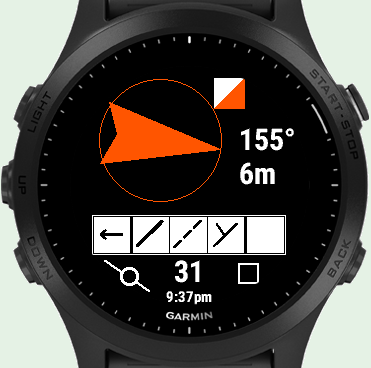
Again we see the arrow and a small control flag, indicating we are nearby a control.
When moving at speed, the arrow is red, indicating the direction is based on your movement.
When you move slowly, the arrow will be gray, indicating the internal compass is being used.
Upon arriving at the correct control, it will show an empty box beneath the name.
Press LAP/BACK to punch the control.

After punching "31", the clue box and lower half will update to show the next control "32".
If the next controls are Random-Order (Score-O), you can press UP and DOWN to scroll through them. If the next control is Ordered (classic) you will not be able to scroll past the next control.
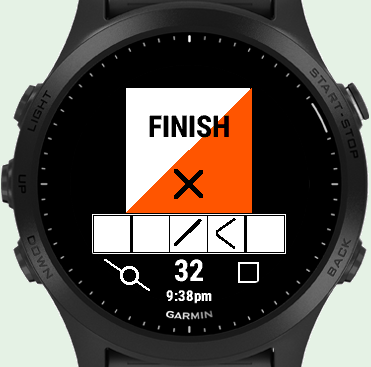
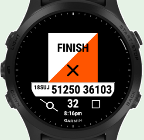
If you arrive at the wrong control (in this case "FINISH"), it will show an "X" on the icon, instead of an empty box.
Press LAP/BACK to punch the "FINISH" control and end the course early.
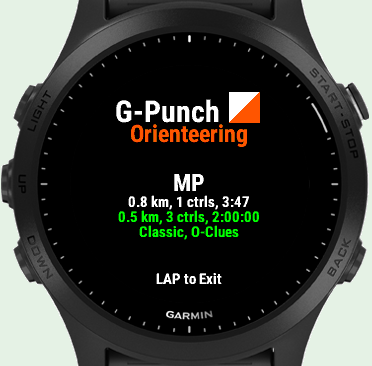
After punching the last control, the watch exits Navigation Mode. The top two lines in white are your results. The course details are shown again in green. For more details on your run open Garmin Connect.
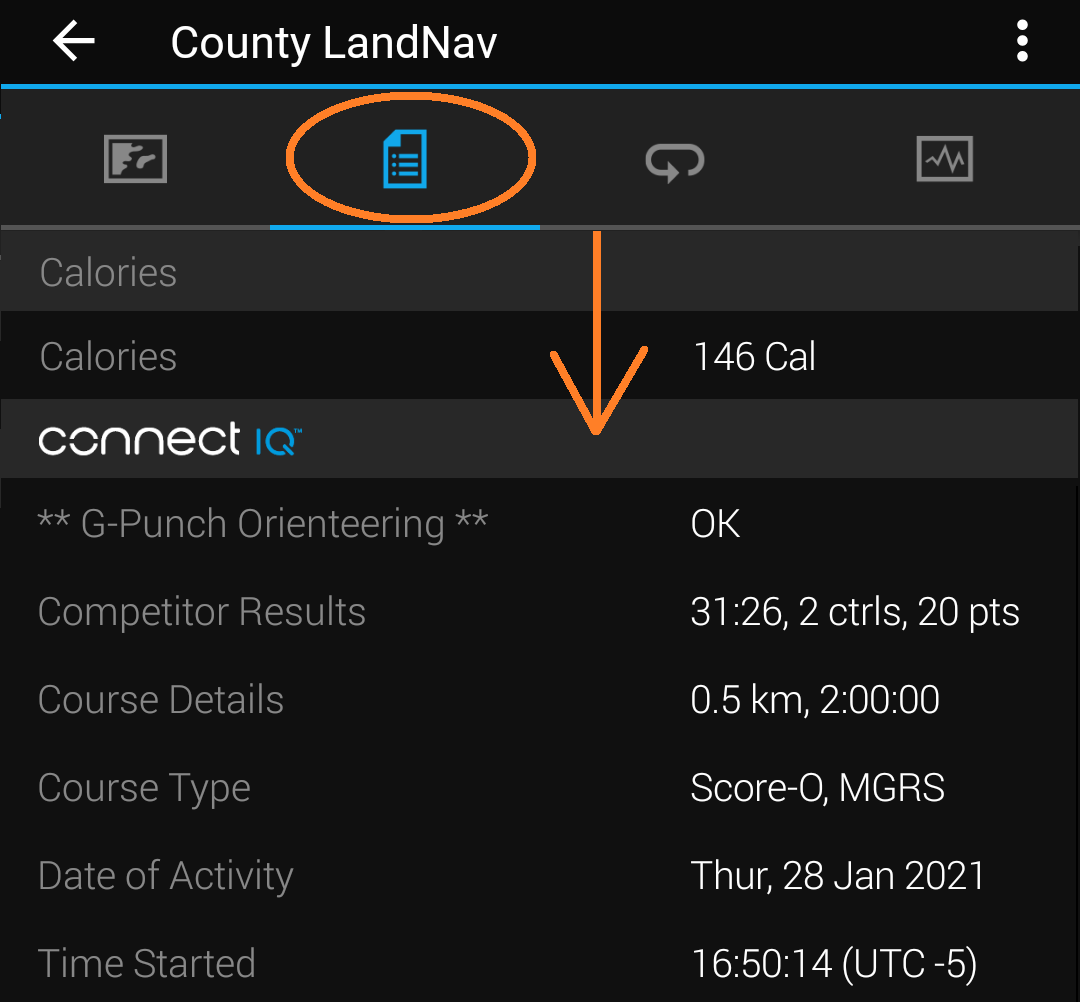
On Garmin Connect Mobile, select the second tab and scroll down to the bottom to see the overall results.
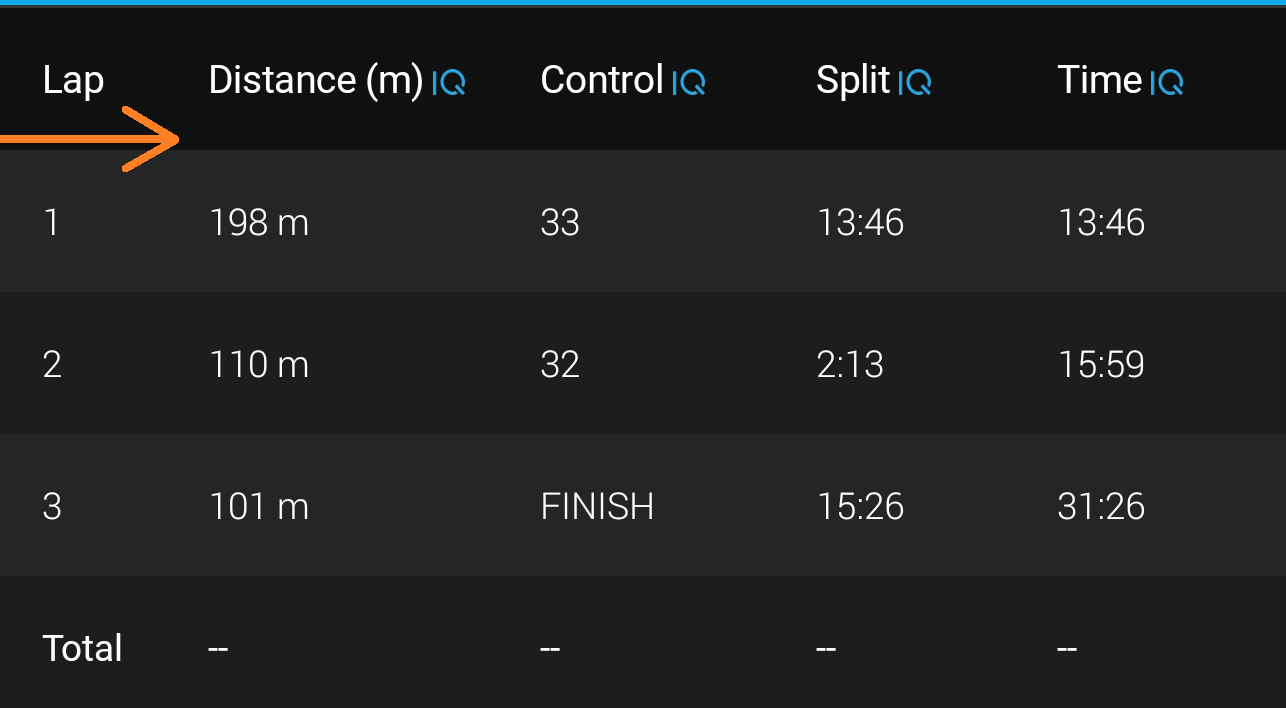
Select the third tab (laps) then rotate your device if needed, scroll to the far right to see the split times and other details.
Below is what the display looks like when displaying MGRS (also possible to display OSGB, OSI, and ITM grid coordinates).
1.2 Settings
The settings must be changed before running the program for the first time. Click here for instructions on how to access the app settings. Continue reading to learn how to configure each setting properly. Most of them require you enter some line of text or select some option, via Garmin Connect Mobile app or the Garmin Connect website. The following Settings are configurable:
Point Data is where all the controls (points) are located.
Course Data contains only the controls (points) you want to include in your course, in the order you specify.
Random Order is a yes/no toggle that sets the default for the controls in the course, either yes for score-o (random order) courses or no for classic (ordered) courses.
Time gives you a countdown alarm to complete the course. The app sounds an alarm if you run out of time.
Score sets the default Point Score for the controls. It also sets the score value you are penalized for every minute you finish after the time has run out.
Display lets the user pick which control clues are displayed during an activity. The options are None, Orienteering Clues if the course has them, Latitude and Longitude, or Military Grid Reference System MGRS. If you select Orienteering Clues but the course does not have any, the app will display 'None' instead.
Precision sets the distance range at which you can discover controls. This setting also affects how close you must get in order to punch controls.
Magnetic Declination enables magnetic declination adjustment for azimuths. This is for when your map is not declinated to magnetic north but grid north, or when close enough to controls to see distance and direction.
1.2.1 Point Data
The Point data is where all the GPS controls are located. It should contain the name, latitude and longitude or grid coordinate for every virtual control in the event, including any extra dummy controls not included in your specific course.
For each control the data must appear in one of two orders: EITHER (1) name, (2) latitude, (3) longitude OR (1) name, (2) grid coordinates. But the overall controls can be in any order. Entries must be separated by a comma (,) and terminated with a semicolon (;). For best results minimize extra whitespace. Name values must be 6 characters or less. The app has been tested to work with over 65 controls.
Point Data Format:

NAME_1,LATITUDE_1,LONGITUDE_1;
NAME_3,LATITUDE_3,LONGITUDE_3;
NAME_2,LATITUDE_2,LONGITUDE_2;
NAME_4,GRID_COORDINATE_4;
NAME_5,GRID_COORDINATE_5;
Accepted formats for point data include (a) decimal latitude/longitude, (b) 15-digit alphanumeric MGRS, (c) 12-digit alphanumeric Ordnance Survey/British National Grid (OSGB), (d) 11-digit alphanumeric Irish Grid (OSI), and (e) 12-digit numerical Irish Transverse Mercator (ITM) formats. Point data may or may not contain spaces, but must contain the exact number of letters and numbers as described above. In other words, lower-precision grid coordinates are not accepted. For lat/lon data, negative values should be used for longitudes in the western hemisphere and latitudes in the southern hemisphere.
Point Data Latitude Longitude Example:

31,38.990121,-76.897368;
32,38.988225,-76.897995;
33,38.988005,-76.893808;
34,38.990232,-76.892706;
35,38.992676,-76.894360;
36,38.993103,-76.892885;
37,38.993519,-76.891097;
38,38.986696,-76.894299;
39,38.984962,-76.897303;
FINISH,38.993841,-76.894417;
START,38.993841,-76.894417;
Note: As with the above example, sample courses in these instructions generally demonstrate Latitude-Longitude data, however the same is possible using grid coordinates now, thanks to Andrew for requesting this functionality!
Point Data Grid Coordinates Example:

31,SD 39323 89600;
32,SD 38947 89893;
33,SD 39274 89893;
34,M 42869 20097;
35,M 42818 19918;
36,M 42231 19800;
37,541932 719659;
38,541773 719502;
39,542627 719626;
FINISH,18S UJ 35938 17800;
START,18S UJ 35941 17672;
Note that different points in the same event can be input using different formats. In the above Point Data, there are several differently-formatted points. Decimal or fractional values are not accepted in grid coordinate input, or it may be interpreted as latitude-longitude datum.
The first three grid coordinates are for points in the UK, using 12-digit alphanumeric OSGB format (2-letter grid square followed by 5-digit easting and 5-digit northing). OSGB grids require two letters followed by 10 digits.
The second three grid coordinates are for locations in Ireland, using 11-digit alphanumeric Irish Grid Reference System (OSI). OSI grids require one letter (Irish Grid square) followed by 10 digits (5-digit easting and 5-digit northing).
The third three grid coordinates are also for locations in Ireland, using 12-digit numerical Irish Transverse Mercator (ITM) format. ITM grids require 12 digits (6-digit easting and 6-digit northing).
The last two points show grid coordinates in MGRS format. MGRS format requires all characters, including 3-digit grid zone designator, 2-digit 100k grid zone designator, and 10-digit location (5-digit easting, 5-digit northing). Note 8-, 6- or 4- digit grids are not accepted for low precision. Be sure to include a leading zero in your grid zone designator if required, for example 04QFJ 12345 67890 (15 digits) is acceptable, however 4QFJ 12345 67890 (14-digits) will produce an error.
The Start and Finish controls can be in the exact same location if they are two separate controls, or they can be the same control. However, no other controls can be close to the Finish or an error will occur. To ensure the app works as it was intended, every control (including extra dummy controls) should be no less than 50 meters apart from other controls.
1.2.2 Course Data
The Course data contains only the controls you want to include into your course, in the order you specify. It contains the names of controls that appear in your course, in the same order you want them to appear in your course. Each control name must be followed by a semicolon (;).
Course Data Format:

NAME_1;NAME_2;NAME_3;
Any controls listed in the Course data must also be listed in the Point data. However, controls in the Point data do not have to be included in the Course data. The first and last entries are important, because they are interpreted as the Start and Finish controls respectively. In these examples we will always label them "START" and "FINISH", for simplicity.
Course Data Example:

START;31;32;33;34;FINISH;
The following example shows how you would implement a butterfly loop in the Course data, at control 32. The user must visit control 32 twice during the course.
Course Data Example:

START;31;32;33;34;35;32;36;FINISH;
The Course data can include additional parameters, as described in the Random Order and Score sections below.
1.2.3 Random Order
Random Order sets the default behavior for controls. Each control is either ordered/classic or random-order/score, with the exception of the first/Start and last/Finish controls which are always ordered/classic.
If Random Order is disabled, your overall course will default to an ordered "classic" course, where the controls must be visited in order from start to finish. If Random Order is enabled, your overall course will default to a random-order "score-o" course, where the controls can be visited in any order.
To set individual controls differently from the default, you must add parameters to the Course data. The format is comma (,) followed by an "O" or an "R" to indicate ordered or random-order. The letter can be uppercase or lowercase.
In the below formatting example, NAME_1 and NAME_5 will remain ordered, because they are the first and last controls. NAME_3 control is set to whatever the default is. The NAME_2 control is set to ordered, and the NAME_4 control is set to random-order.
Course Data Format Example:

NAME_1;NAME_2,O;NAME_3;NAME_4,R;NAME_5;
Let's say you wanted to design a hybrid course, with a few ordered controls, and several random-order controls. You would enable Random Order in the settings, then add some additional ordered controls to the Course Data. In the below example, the user punches Start then must punch control 31. Then they can go to any control from 32 to 36 in any order, or go straight to 37. The user must punch 37 before punching the Finish.
Course Data Example:

START;31,o;32;33;34;35;36;37,o;FINISH;
Let's say you wanted to design a course with two control "boxes". The user can visit the controls inside each box, in any order, however they must visit the intermediate ordered controls between each box, and they must visit each overall box, in order. The following two examples demonstrate different ways of doing this. Both examples will result in the exact same course for the user:
In the first example, Random Order is disabled, making it an ordered "classic" course by default. Additional parameters here define individual controls as random-order. Controls 31, 35 and 39 remain ordered and must be visited in order.
Course Data Example, Variant 1:

START;31;32,r;33,r;34,r;35;36,r;37,r;38,r;39;FINISH;
In the next example, Random Order is enabled, making it a random-ordered "score-o" course by default. The additional parameters here mark controls as ordered. Controls 32-34 and 36-38 remain random-order and can be visited in any order.
Course Data Example, Variant 2:

START;31,o;32;33;34;35,o;36;37;38;39,o;FINISH;
If the user skips an ordered/classic control the results will indicate "Missed Point", but not if they skip a random-order/score-o control. Random order points are treated as optional controls, so if the user does not visit every Random order point in the course, the results will NOT indicate "Missed Point". An examination of the results (in the Garmin Connect Lap review) will indicate which controls in particular, and how many controls in total, were visited.
1.2.4 Time
Time gives you a countdown timer to complete the course. When you run out of time, the app sounds an alarm.
If your course includes score point values for controls and you run out of time, you will be penalized the default Score value for each additional minute it takes you to complete the course.
There is no way to disable the countdown timer. However if you do not want to be penalized for exceeding the time limit, simply change Score to 0, and it will not penalize you for finishing the course late. Alternatively, you can set Time to a very high value such as 180 minutes, equivalent to 3 hours, or 360 minutes, equivalent to 6 hours.
1.2.5 Score
Score sets the default score point value for controls. To set individual control scores differently from the default, you must add parameters to the Course data. The format to add a parameter is comma (,) followed by a numeric value to indicate the point value for that control. Score values will always be 0 for the first (Start) and last (Finish) controls.
Score also sets the point penalty for each minute you finish late, sometimes used in random-order "score-o" courses. If your course has no score point values, set this to 0. You will not receive any score penalty for finishing late.
In the below formatting example, NAME_1 and NAME_5 will remain 0 points, because they are the first and last controls. NAME_3 control will be worth whatever the default point value is. The NAME_2 control is 30 points, and the NAME_4 control is 40 points.
Course Data Format Example:

NAME_1;NAME_2,30;NAME_3;NAME_4,40;NAME_5;
Let's say you wanted to design a Random-order (score-o) course, where the controls have different point values. You would set the Random Order to enabled, then add additional parameters with the score values after each control in the Course data. In this example, controls 31 thru 33 are worth 30 points, controls 34 through 36 are worth 40 points.
Course Data Example:

START;31,30;32,30;33,30;34,40;35,40;36,40;FINISH;
You can also combine score and random-order parameters in the Course data. Just include another comma (,) and the second parameter. The parameters can be in any order, as seen in the following two examples. Both examples variations create the exact same course for the user.
In this first example, Random Order is enabled and Score is 100. Controls 32, 33, 34 are default random-order controls each worth the default amount, 100 points. Controls 31, 35 are ordered controls worth 0 points.
Course Data Example, Variant 1:

START;31,o,0;32;33;34;35,0,o;FINISH;
In this second example, Random Order is disabled and Score is 0. Controls 31, 35 are default ordered controls each worth the default amount, 0 points. Controls 32, 33, 34 are random-order controls each worth 100 points.
Course Data Example, Variant 2:

START;31;32,r,100;33,100,r;34,100,r;35;FINISH;
Any score values in the Course data will make the app calculate total score, even if the default Score is set to 0.
If you wanted to include score points in your course, but didn't want to implement a time limit and score penalty system for finishing late, set the Time to a very high value such as 180 minutes, equivalent to 3 hours, or 360 minutes, equivalent to 6 hours.
1.2.6 Display
Display lets the user pick how to display the control clues during the activity. The options available are:
- None
- Orienteering Clues
- Latitude and Longitude
- Military Grid Reference System (MGRS)
- Ordinance Survey National Grid / British National Grid (OSGB)
- Irish Grid Reference Sytem (OSI)
- Irish Transverse Mercator (ITM)
If the user selects orienteering clues, but there are no orienteering clues in the Point data, then the display will switch to None, and no clues will be shown. (Certain Garmin devices do not support orienteering clues, generally due to low memory or older firmware, see compatibility chart at the end of this document.)
If the points are outside the boundaries of the coordinate reference system (i.e., user selects OSGB grid while navigating controls which are virtually located far away from the UK), it will display an error because it is out of bounds.
To change from one display option to another, you must exit the app. Adjust the settings and ensure your changes are saved, then restart the app.
1.2.7 Precision
Precision sets the distance range users can "discover" controls. The actual distance is a random value between the low and high value of the range. This setting also affects how close you have to get to identify and punch controls.
| Precision Level |
Distance Range to
Discover Controls |
Distance Range to
Identify & Punch Controls |
| Low |
25-40 meters |
9 meters |
| Normal |
15-40 meters |
7 meters |
| High |
15-30 meters |
5 meters |
Due to present-day GPS accuracy limitations, Normal or even Low setting is recommended for use in places where GPS accuracy is less effective, for instance in highly built-up urban areas, in areas of very dense forest canopy or in terrain with a great deal of topographic variation (i.e., nearby a cliff wall). This is because low GPS accuracy may make discovering controls more difficult and more nuanced than regular orienteering. Users may also find it helpful to set their devices to detect GPS signal "every second" instead of "smart GPS", to obtain higher accuracy when moving through the woods.
Normal and or Low setting is also recommended in cases when the controls are assigned to smaller objects (i.e., a rootstock). This is because orienteers moving towards actual control locations may be surprised to learn the GPS is inaccurate by several meters. It can be frustrating when orienteers arrive at what they believe to be the control location (especially if a physical control is also located there), but the GPS says they have to move further to "approach" the virtual point – or worse, that they haven't even discovered the actual virtual control location.
Orienteers who are determined to improve at navigation are encouraged to keep the Normal setting, or terrain permitting, set it to High. Once running, the settings cannot be changed, so adjust the settings before you begin.
Smarter navigation techniques such as "attack-point" method, remains the most effective means to navigate and find controls. Once you discover a control and the device shows an arrow, move to wherever the App indicates the control is, not to where you think the control is.
1.2.8 Magnetic Declination
Most orienteering maps account for magnetic declination. This means you can accurately orient the map to north using a regular compass. For these sorts of maps, it is best to keep the 'Magnetic Declination' setting on the app set to 0.0.
For some maps, like government or military maps, the north on the map is 'grid north', and to orient the map to compass north requires an additional calculation (depending upon the declination of the area). Some compasses also come equipped with an adjustible 'declination' setting, which if you set correctly, it does the calculation for you. In this app, the Magnetic Declination setting is for when your map is not declinated to magnetic but grid north, and you are using a compass that does not adjust for magnetic declination. This setting affects the numerical azimuth shown when you gets close to a control, or whenever the app shows distance and direction as a clue.
If you attend an orienteering or rogaining event that uses grid-north-oriented maps, it is important to consider changes in magnetic declination before beginning to navigate.
1.3 Orienteering Clues
This app supports orienteering clues or symbols for most newer Garmin watches (for a list of compatible watches scroll to the end of the document). To enable orienteering clues in the app, the course must contain orienteering clues, which is to say, the course designer must include them when they save all the points.
Orienteering clues are included after the longitude or grid coordinate in the Point data section. (Note all future examples apply to grid-coordinates just as they have lat-lon pairs)
Point Data Format:

NAME_1,LATITUDE_1,LONGITUDE_1,CLUES_1;
NAME_3,LATITUDE_3,LONGITUDE_3,CLUES_3;
NAME_2,LATITUDE_2,LONGITUDE_2,CLUES_2;
Because of watch screen size, only five clues are allowed per control. A space designates a blank space in the clue. If you do not include spaces, all clues will appear left-justified during the activity. The following example shows some sample orienteering clues, visible as clues with the proper font installed to the computer.
Point Data Example:

31,39.163775,-76.720700,¬àáą ;
32,39.164208,-76.721928,  àĆ ;
33,39.164470,-76.723166, à  ĕ;
34,39.162430,-76.718717,¨ ê Ċ;
FINISH,39.163435,-76.721300, ºóœċ;
START,39.163435,-76.721300, ºóœċ;
As shown below, the orienteering clues appear as extended Unicode characters if you do not switch to W font. For those who cannot install the W font, this is unavoidable.
Point Data Example:

31,39.163775,-76.720700,¬àáą ;
32,39.164208,-76.721928,  àĆ ;
33,39.164470,-76.723166, à  ĕ;
34,39.162430,-76.718717,¨ ê Ċ;
FINISH,39.163435,-76.721300, ºóœċ;
START,39.163435,-76.721300, ºóœċ;
When designing a course, to be able to read the symbols correctly, download, install and change the text to the W font, located at fontSample.zip. The font includes all of the below orienteering clues. If you cannot install the font, then simply copy and paste orienteering clues from the below chart.
W Font Orienteering Symbols:
¢£¤¥
¦§¨©ª«¬®¯°
±²³´µ¶·¸¹º»¼½¾¿À
ÁÂÃÄÅÆÇÈÉÊ
ËÌÍÎÏÐÑÒÓÔÕ
Ö×ØÙÚÛÜÝÞß
àáâãäåæçèéêëìíîïðñòóôõö÷ø
ùúûüýþÿĀāĂă
ĄąĆ
ćĈĉĊċČčĎ
ďĐđĒēĔĕĖ
ėĘęĚěĜĝĞ
ğĠġĢģĤĥĦ
ħĨĩĪīĬĭĮ
įİıIJijĴĵĶ
ķĸĹĺĻļĽľĿ
ŀŁłŃńŅņŇ
ňʼnŊŋŌ
ōŎŏ
ŐőŒœŔŕŖŗŘřŚś
ŜŝŞşŠšŢţŤťŦŧŨũŪ
ūŬŭŮůŰűŲųŴŵŶŷŸŹźŻżŽžſ
Note: If the above three blocks contain a bunch of random letters instead of Orienteering Symbols, it means for some reason you are unable to view the symbols on this webpage. If you are viewing a translation of this webpage, see if the original (English) version shows the proper symbols. If that does not work, download the W font, located at fontSample.zip and try to open the sample file in another viewer.
GP Loader
Version 1.2.7 (initial release on 2022-05-19)
Overview
The GP Loader app loads courses from the internet into the G-Punch Orienteering app.
Rather than having to manually enter data into the G-Punch app settings whenever you want to run a course, now you can quickly load preexisting data from the internet (via your mobile device). Write your own courses in JSON, or convert to JSON format from formats like International Orienteering Federation IOF version 3.0 XML, Condes XML, Purple Pen XML, even Google KML. The only requirements are the file be in JSON format, and that the server support HTTPS security. You can access files using Google Drive, Drop Box, or a locally-hosted file using TinyWebServer. See here for details.)
There is little to no password protection for course files located on a public server. If you want to see password protection in future versions, please click "contact developer" on the app store page and let us know!
2.1 A Walkthrough Using Google Maps
Unfortunately, as of March 2026 this functionality has been erroneously overwritten and needs to be re-implemented in the next update; In the meantime, please use ANY other file format - open any of the other samples and edit in your points - it should work. This webpage will be updated when the fix is applied and this functionality works again!
Note: The following steps are a simple way to create a course using Google Maps that can be processed by GP-Loader. For repeat controls, butterfly loops, control boxes, or multiple courses, you'll want to skip this section and begin with 2.2 Comprehensive Course Editing Steps.
Download the latest versions of GP Loader and G-Punch Orienteering apps
Go to Google Maps and log in. A google account is required for this walkthrough.
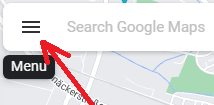
Click the menu button at the top left of the window.
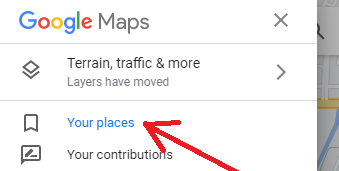
On the menu, select 'Your Places'
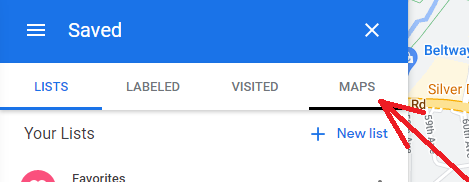
Select 'MAPS' tab on the right.

At the bottom left, click the 'Create Map' link.
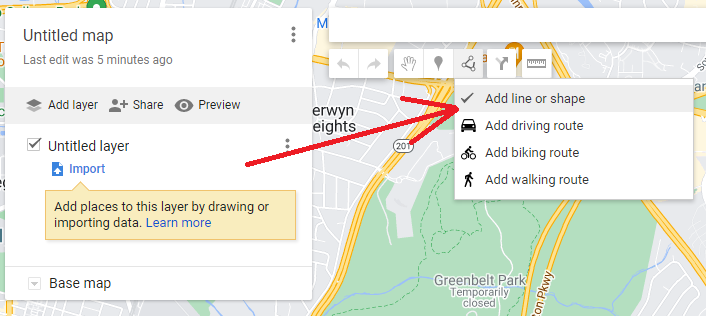
Click the 'Draw a Line' button and select 'Add line or shape'.
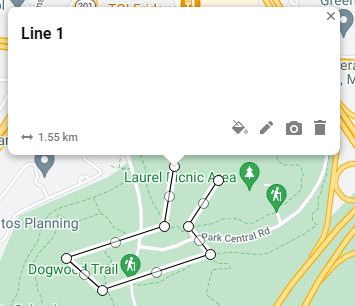
Draw a line with at least one intemediate point, beginning where you want the START to be, and ending where you want the FINISH to be. Pick the points carefully. Each point in the line will become a control point in this course, so you may want to carefully edit the point locations before the next step. You may also wish to switch the background map to satellite imagery for better awareness of where the points will be.
Note: The ONLY control points that can be in the same location are the START and FINISH controls. All others MUST be 50 meters or further from other control points. To draw a line that starts and ends at the same spot, first draw the line without closing the object, then click and drag one of the points on top of the other.
NOTE: This tutorial will only work with a line, and not a polygon. Do not close the line on itself, or Google Maps will automatically turn your line into polygon.
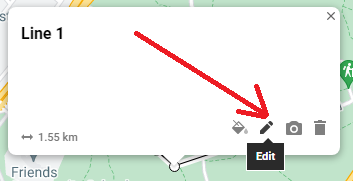
Click the pencil icon to edit the line.

Note: Ensure there is only one object in the file. If you export a file with more than one object in it, GP-Loader will not be able to properly process the data.
Rename the line to the desired course name.
Note: Keep your course names short, under 15 characters is best, so they can be viewed on all devices, including those with smaller screens. Here we've called our course 'Google Course'.

Click the three dots to the right of the layer, then select 'Export data', then 'CSV'.
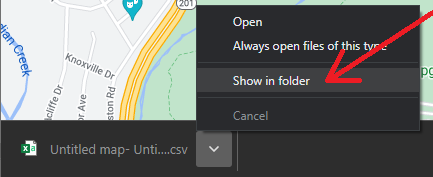
The browser will download and save a file to your computer. Open the file location, then open the file in a text editor.
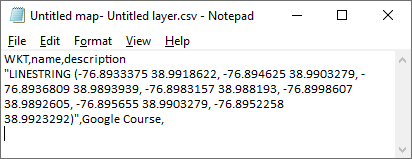
This is the CSV file that was exported from Google Maps. We will now make a few quick edits, without changing the coordinates string.
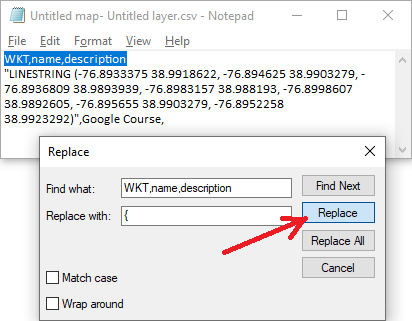
Replace WKT,name,description with { (open bracket).
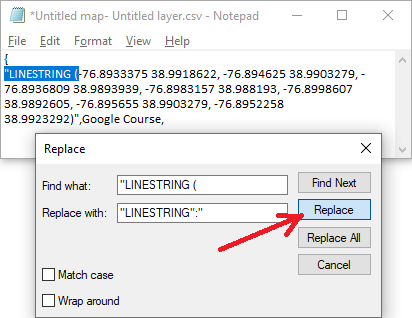
Replace "LINESTRING ( with "LINESTRING":"
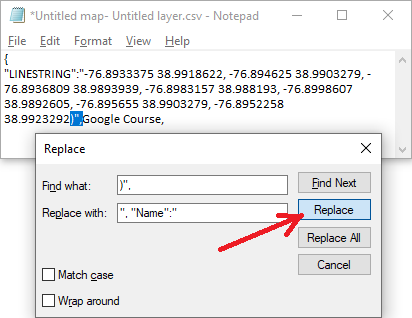
Replace )", with ", "Name":"
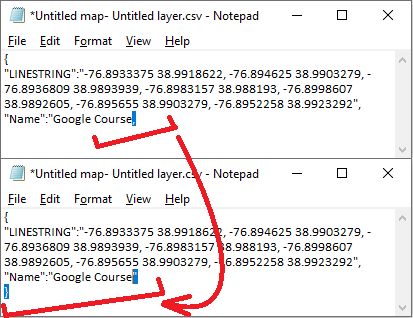
Replace the final comma at the end of the file with " } (quotation marks & closed bracket).
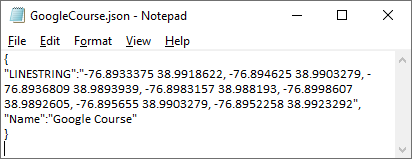
Now save the file as a JSON file, in this case we've saved it as 'GoogleCourse.json'. After making edits to your JSON file, copy and paste the file content to JSONLint.com and click 'Validate' to confirm there are no JSON syntax errors (the GP-Loader app will only read the json file if there are no syntax errors). For more information about JSON file format, see section 2.5 JSON Syntax Basics.
Note: For this JSON file to be interpreted correctly, there are a few rules that the Google CSV Exported files must comply with. There must be a comma and space between each point. Each point must be longitude followed by a space then latitude. There is no latlon switch option available for Google CSV formatted course files. If you have any questions or have difficulty loading, please contact developer on our app store page.
#0 (Classic Course) GOOGLE-CSV format: https://www.landnavapp.com/samples/GoogleCourse.json

{
	"LINESTRING":"-76.8933375 38.9918622, -76.894625 38.9903279, -76.8936809 38.9893939,
     -76.8983157 38.988193, -76.8998607 38.9892605, -76.895655 38.9903279, -76.8952258 38.9923292",
	"Name": "Google Course"
}
Above we can see the final JSON formatted file. Note: In the above edits, we made no changes to the coordinates string, the numbers. They remained the same.
If you've been following along with your own file, save it as 'GoogleCourse.json' to your desktop.
Next we will upload the file to Google Drive, which will allow us to access it via the internet when we run the GP Loader app.
Go to Google Drive and log in if you haven't yet. Drag and drop the 'GoogleCourse.json'file to Google Drive, and wait for it to upload.
Right-click on the file, select "Share" then again select "Share".
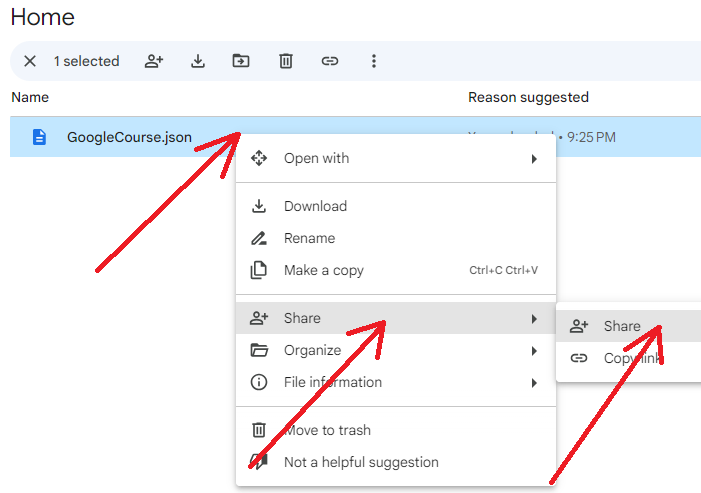
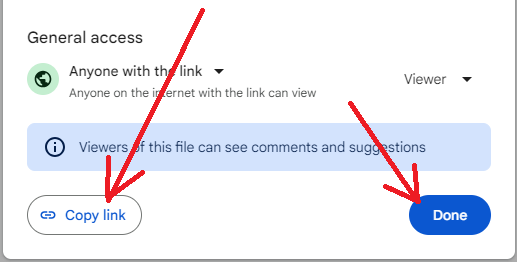
Select "Restricted" and choose "Anyone with the link".
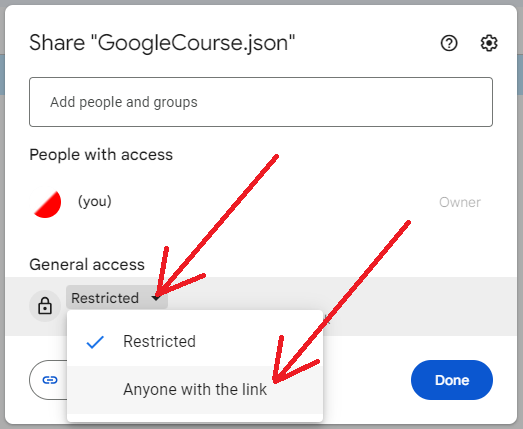
Select "Copy Link" then "Done".
Open a text editor and paste the link. It should look similar to:
https://drive.google.com/file/d/XXXXXXXXXXXXXXXXXXXXXXXXXXXXXXXXX/view?usp=sharing
The above you have will have a string of characters where the XXXXX are. Take that string of characters and copy and paste it to a new line.
Now copy the below text so that it is placed before the string, so it looks like this:
https://drive.google.com/uc?export=download&id=XXXXXXXXXXXXXXXXXXXXXXXXXXXXXXXXX
This is what is called the "direct download" link, which will allow us to access it without any intermediate pages. For further information on what we just did, see this link or this link for Drop Box users.
Next, we must past this new link into the URL Settings in the GP Loader app. If you have adjusted permissions and copied the link properly, it should be accessible from the web. You can also test this by loading the copied URL into a web browser and see if downloads the file.
Finally, run the GP-Loader app, and select the 'Google Course' from the menu option. It should load the course correctly... but---
NOTE: When you first successfully load a course via GP Loader, it will proceed to run the course in the G-Punch app. If there are any logical or content errors in the course or point data, the G-Punch app will show an error message. Don't get frusterated. Just take a step back and try to determine what is the problem, and if the problem occurs when you are loading it in the GP Loader, or when the G-Punch app is loading it.
If it's not loading, or you need assistance with getting this to work, click "Contact Developer" on the Garmin App store page, explain the problem and include your email address so the developers can send you a reply.
Big thanks to Thomas M for asking for Google Drive & Drop Box support.
2.2 Comprehensive Course Editing Steps
The Google Maps course-creation steps in the above section will only work for simple courses. They will not work for other courses involving repeat controls, butterfly loops, or control boxes. The same applies if you wish to create multiple courses that share common control points. You may be able to start with the google course, but you will have to make edits or use a different method to create your course. The following sections discuss course editing in more detail. The recommended steps involved in making a course outside of Google Maps are as follows. Details follow below.
- Download the latest versions of GP Loader and G-Punch Orienteering apps
- Create a log file for GP Loader and G-Punch Orienteering apps
- Download all sample files (available here)
- Create a JSON course file, or convert an existing KML/XML course file into JSON format, making edits as necessary
- Upload the JSON file to a HTTPS-compliant web server, Google Drive, Drop Box, or use TinyWebServer for local usage (see here for details)
- Enter the URL for your JSON file into the app Settings for GP Loader
- Run the GP Loader app, press MENU (or hold the UP button) and select Load course
- The app will prompt you to select a Course
- When asked if you want to launch the G-Punch Orienteering app, confirm
- Once G-Punch Orienteering app loads the course, you will be able to run it
2.3 Creating a Log File
Creating a log file is optional. Many errors are indicated with an audible beep/vibration and will show a message on the screen. One of the most frequently encountered errors is caused by poor internet or bluetooth connection while running GP Loader. Your bluetooth may be off, your phone may not be in range of wifi signal, or it may not have reliable cell signal, and the App will show either "Bluetooth Off" or "URL/Req Timeout". If this occurs, just try it again, and if it doesn't work a second time, check your connection - it could be the wifi, bluetooth, even outside interference. In order to load json files from the web, an internet connection is required. Once a course has been loaded to G-Punch, internet is no longer required.
Creating a GP Loader log file is recommended because it allows you to receive additional feedback when and if a course contains errors. Additionally, if you create a log file for the G-Punch Orienteering app, it will save a copy of the last course loaded. This is useful because GP Loader overwrites the previous Point and Course data each time it loads the G-Punch Orienteering app.
Log files are only accessible via USB connection. To create a log file, plug your Garmin device into a computer to access the files via USB. Go to the D:\GARMIN\APPS\ subdirectory. You need to figure out which PRG file corresponds to the GP Loader app (the files are named randomly). Once you determine the filename, go to the D:\GARMIN\APPS\LOGS\ subdirectory and create a blank text file using the same name, but with ".TXT" (or ".LOG" on some older devices) as the file type. For example, if your GP Loader app is named ABC12345.PRG, create a blank text file in the D:\GARMIN\APPS\LOGS\ subdirectory and rename it ABC12345.TXT. If you don't know which app corresponds to the GP Loader app, just create a log file for every app.
Complete the same steps to create a log file for the G-Punch Orienteering app.
Whenever you uninstall and reinstall these apps, you will also have to rename the log file(s) so they correspond to the filename of the watch app(s).
Running the apps will populate the log files. To view the log files, plug your device to into your computer via USB connection and edit the files using Notepad. The log files themselves do not require deletion, because they overwrite themselves after several usages. Going in and editing or clearing the contents of the log file is allowed.
2.4 Converting to JSON
Course files from Condes and PurplePen can be saved to IOF Version 3.0 XML file format. Google KML files are in another XML format. To convert XML files into JSON format, search the web for "convert XML to JSON". Use the web to convert the file, and save the output to a JSON file, (select 'no' if it asks to add prefixes in front of attributes during conversion).
Some converted files may require additional edits. For example, when converting KML files for MapRun Scatter or Score courses, you may need to manually add "Random", "Score" or other fields into the JSON file. KML files loaded from OpenOrienteeringMap should work as-is, but changes can of course be made. See KML samples below.
When converting from IOF file format, the geocoordinates in the XML file must be in Latitude-Longitude format OR other formats (see highlighted section below). Sometimes in older versions of IOF course files, these coordinates were not Latitude-Longitude but another format. For example, "38.990232, -76.892706" is correct, but "4317396, 336078" with no decimal point, will not work. To convert these geocoordinates to latitude-longitude requires additional research. You may be able to use the G-Punch Data Generator to convert data from EPSG-coded IOF-XML file, thanks to Andreas T.
UPDATE 20220519: New version allows input of certain formatted geo-coordinates. In addition to lat lon, new formats accepted include 15-digit MGRS "13S ED 04536 01064", 12-digit OSGB/BNG "TL 13763 07818", 11-digit OSI format "W 27053 90123" and 12-digit ITM format "614391 895518". (Coordinates not containing decimals will automatically be interpreted as one of these formats.) See Compatible Device List to see which devices support these new capabilities.
You can also remove several unused fields from IOF formatted files to save memory, see details in IOF section below.
Orienteering Clues are not natively included in IOF or KML files. To add Orienteering Clues to your file so the watch will show them in your event, you will need to manually enter them into the JSON file. Refer to the Orienteering Clues section above for more information.
After making edits to your JSON file, upload the contents to JSONLint.com to check it for JSON syntax errors.
Finally, save the JSON file to a HTTPS web location where others can access it. Google Drive, Drop Box, or a local web server like TinyWebServer will work. See here for details.) Enter the direct-download URL for the file into the Settings. When you run the app it should load the course file or produce an error message indicating what's wrong.
If you need assistance, click "Contact Developer" on the Garmin App store page, explain the problem and include your email address so the developers can send you a reply.
Download all example files at samples.zip.
2.5 JSON Syntax Basics
GP Loader reads JSON files, which are essentially a regular-text formatted collection of name/value pairs. In these instructions, we use green font to identify the 'name' or 'keyword' portion of name/value pairs. When you run GP Loader, it will interpret these keywords in particular ways. Hence, keywords must be spelled correctly. The spelling and capitalization of keywords must also be consistent across the file.
JSON Name/Value Pair Example:

	"Id": "Test"
In the below example, the "Position" keyword is a Name/Value pair containing a MGRS grid coordinate.
"Position": "18S UJ 35938 17800"
JSON files are further organized through curly braces { } and square brackets [ ]. Each of these structures contain one or more name/value pairs.
Entries surrounded by { braces } are called a dictionary. In the below example, the "Position" keyword is paired with a dictionary containing two name/value pairs. Only use a dictionary in cases where you are using lat-lon pairs. For geo-grid coordinates, stick to the above Name/Value pairing.
"Position": { "lon": "-76.894417", "lat": "38.993841" }
Dictionaries are unordered, meaning the name/value pairs inside a dictionary can appear in any order.
Entries surrounded by [ brackets ] are called an array. Arrays are ordered, meaning the order of elements in an array is important. Below, the "CourseControl" keyword is paired with an array containing three dictionaries.
"CourseControl": [ { "C": "1" }, { "C": "2" }, { "C": "3" } ]
Although in this example, the dictionaries in the array only contain a single name/value pair, dictionaries usually contain multiple name/value pairs.
A comma ( , ) follows every name/value pair, except the last entry in each level.
"Position": { "lon": "-76.894417", "lat": "38.993841" }, "Id": "Test"
Finally, The entire file must be enclosed in curly brackets. So essentially each JSON file contains one big dictionary.
{
	"Position": { "lon": "-76.894417", "lat": "38.993841" }, "Id": "Test",
	"CourseControl": [  { "C": "1" }, { "C": "2" }, { "C": "3" }  ]
}
The above text is not a valid course file, but it is in valid JSON format. To confirm it is formatted correctly, upload the above lines (including brackets) to JSONLint.com and click 'validate'. We can use the above JSON text to demonstrate a format diagram. The below diagram portrays the structure of the above JSON text.
Example Format
- Id
- Position
- CourseControl […]
In the diagram, keywords on the far left are considered "base-level" keywords because they are not located inside other structures.
Indented keywords are located inside other dictionaries or arrays. The "lat" and "lon" entries are located inside the "Position" dictionary. The "C" entry is located in a dictionary, in the "CourseControl" array.
The […] indicates the "CourseControl" keyword contains an (ordered) array holding one or more dictionaries.
An asterisk (*) indicates the entry is optional, a dash (/) indicates other keywords are interchangeable. In all cases, use the prescribed capitalization, or if in doubt Capitalize the first letter of each word, for instance "CourseControl".
2.5.1 Menu Files
Menu files allow you to select amongst a set of files easier. You can select course files, or other menu files.
Menu files must have a "Menu" [ array ] at the base level. Inside the Menu array are one or more dictionaries. Each of the dictionaries must contain "Name" and "Url" fields. Here Url is spelled Url, but URL or url will also work.
When you first run GP Loader, it will begin to load whichever URL is in the app settings. The following URL is what comes pre-loaded when you first install the app.
MENU File: https://www.landnavapp.com/samples/Menu-0.json

{
	"Title":"Sample Courses",
	"Menu": [
		{ "Name":"Google Course",    "Url":"https://www.landnavapp.com/samples/GoogleCourse.json"       },
		{ "Name":"Lat-Lon Courses",  "Url":"https://www.landnavapp.com/samples/Menu-1.json"             },
		{ "Name":"Grid Courses",     "Url":"https://www.landnavapp.com/samples/g_samples/Menu-1.json"   },
		{ "Name":"MGRS Courses",     "Url":"https://www.landnavapp.com/samples/m_samples/Menu-1.json"   }
	]
}
For a discussion of the first linked course file, the Google CSV Course, see section 2.1, A Walkthrough Using Google Maps
Below is from the second link, "Lat-Lon Courses". Also see corresponding Menu files for comparison Grid Courses (for OSGB/OSI/ITM) and MGRS Courses
MENU File: https://www.landnavapp.com/samples/Menu-1.json

{
	"Title":"Lat-Lon Courses 1",
	"Menu": [
		{ "Name":"Clas SIMPLE",      "Url":"https://www.landnavapp.com/samples/1-SIMPLE.json"           },
		{ "Name":"Clas SIMPLE Clue", "Url":"https://www.landnavapp.com/samples/1-SIMPLE-Clue.json"      },
		{ "Name":"Clas SHORT",       "Url":"https://www.landnavapp.com/samples/1-SHORT.json"            },
		{ "Name":"Clas SHORT Clue",  "Url":"https://www.landnavapp.com/samples/1-SHORT-Clue.json"       },
		{ "Name":"Clas KML Clue",    "Url":"https://www.landnavapp.com/samples/1-KML-Clue.json"         },
		{ "Name":"Clas KML OOM",     "Url":"https://www.landnavapp.com/samples/1-KML-OOM.json"          },
		{ "Name":"Clas IOf",         "Url":"https://www.landnavapp.com/samples/1-IOF.json"              },
		{ "Name":"Clas IOF Crop",    "Url":"https://www.landnavapp.com/samples/1-IOF-Crop.json"         },
		{ "Name":"Clas IOF Abr",     "Url":"https://www.landnavapp.com/samples/1-IOF-Clue-Abr.json"     },
		{ "Name":"Clas SHORT Abr",   "Url":"https://www.landnavapp.com/samples/1-SHORT-Clue-Abr.json"   },
		{ "Name":"Clas SHORT Error", "Url":"https://www.landnavapp.com/samples/1-SHORT-Clue-Error.json" },
		{ "Name":"Scor SIMPLE Clue", "Url":"https://www.landnavapp.com/samples/2-Simple-Clue.json"      },
		{ "Name":"Scor KML Clue",    "Url":"https://www.landnavapp.com/samples/2-KML-Clue.json"         },
		{ "Name":"Scor SHORT Clue",  "Url":"https://www.landnavapp.com/samples/2-SHORT-Clue.json"       },
		{ "Name":"Scor IOF Clue",    "Url":"https://www.landnavapp.com/samples/2-IOF-Clue.json"         },
		{ "Name":"More Lat-Lon",     "Url":"https://www.landnavapp.com/samples/Menu-2.json"             }
	]
}
The app first checks the base-level contents of the file for a "Menu" [array]. If it finds one, it knows the file is a Menu file, and not a traditional course file.
It looks inside the "Menu" array for dictionary fields containing "Name" and "Url" fields, and if it can't find them it shows an error. Menus are limited to 16 entries max, but you can use menu files to load other menus files. In the above example, if the user selects the last "More Courses" menu option, it will load this "Menu_2.json" file. Also see corresponding Menu files for comparison Grid Courses (for OSGB/OSI/ITM) and MGRS Courses
MENU File: https://www.landnavapp.com/samples/Menu-2.json
{
	"Title":"More Lat-Lon",
	"Menu": [
		{ "Name":"Hybr SIMPLE",       "Url":"https://www.landnavapp.com/samples/3-SIMPLE.json"            },
		{ "Name":"Hybr SHORT Clue",   "Url":"https://www.landnavapp.com/samples/3-SHORT-Clue.json"        },
		{ "Name":"Clas IOF Extra",    "Url":"https://www.landnavapp.com/samples/1-IOF-Clue-Extra.json"    },
		{ "Name":"Clas SHORT Extra",  "Url":"https://www.landnavapp.com/samples/1-SHORT-Clue-Extra.json"  },
		{ "Name":"Clas IOF LonLat",   "Url":"https://www.landnavapp.com/samples/1-IOF-Clue-LonLat.json"   },
		{ "Name":"Clas SHORT LonLat", "Url":"https://www.landnavapp.com/samples/1-SHORT-Clue-LonLat.json" },
		{ "Name":"Mult IOF",          "Url":"https://www.landnavapp.com/samples/4-IOF-Clue.json"          },
		{ "Name":"Mult SHORT",        "Url":"https://www.landnavapp.com/samples/4-SHORT-Clue.json"        },
		{ "Name":"Lat-Lon Courses",   "Url":"https://www.landnavapp.com/samples/Menu-1.json"              }
	]
}
Once you make a selection, the app loads the JSON file at the associated web address, either a course or another menu.
SIMPLE and KML files can only contain one course per file. If you have several unrelated course files, it is recommended to use a menu file, so the user can pick from various courses.
For events with multiple courses that share common controls, a menu is not needed if you use SHORT or IOF format course files. SHORT and IOF format files can contain multiple courses per file, and will also automatically present the user with a choice between those options. For multiple-course file examples, see the #4 examples below in Section 2.6.6.
NOTE: For Google Drive and Drop Box files, be sure to use the direct-download file link, rather than the regular file URL. For more information see here for details.
2.6 Course File Formats
GP Loader can interpret from five general JSON file strutures, GOOGLE-CSV, SIMPLE, SHORT, KML and IOF. Their structures are presented below.
GOOGLE-CSV
- name/Name
- *Random/R
- *Time/T
- *Score/S
- *Precision/P
- LINESTRING
|
SIMPLE
- name/Name
- *Random/R
- *Time/T
- *Score/S
- *Precision/P
- CourseControl/Legs […]
- Name/name/Control/C
- *Random/R
- *Score/S
- *Clue/A
- Location/L
- *LonLat
|
SHORT
- Control […]
- Course {…} or […]
- name/Name
- *Random/R
- *Time/T
- *Score/S
- *Precision/P
- CourseControl/Legs […]
- Control/C
- *Random/R
- *Score/S
- *LonLat
|
KML
- *kml
- Folder/Document
- *Style
- Folder
- name/Name
- *Random/R
- *Time/T
- *Score/S
- *Precision/P
- Placemark/Legs […]
- Name/name/Control/C
- *Random/R
- *Score/S
- *Clue/A
- Point
- *LonLat
|
IOF
- iofVersion
- RaceCourseData
- Control […]
- Id/C
- *Clue/A
- Position/L
- lat/Lat/LAT
- lng/Lng/LNG/lon/Lon/LON
- Course {…} or […]
- name/Name
- *RandomOrder/R
- *Time/T
- *Score/S
- *Precision/P
- CourseControl/Legs […]
- Control/C
- *randomOrder/R
- *Score/S
- *LonLat
|
The various formats share several common keywords. Keywords with a star next to them are optional. Some of the keywords in the above diagrams have been aligned horizontally to make comparing and contrasting easier. To better understand the underlying structure of these files, it may help to think of them in terms of the corresponding G-Punch Orienteering app settings.
In SHORT and IOF formats, the Point data (control labels, coordinates and O-clues) are located in the "Control" dictionary, and the Course data is located in the "Course" and "CourseControl" entries. The Point and Course data is separated, which allows multiple courses to share common controls within a single file.
In contrast, for SIMPLE and KML formats, the Point data and Course data is combined into the "CourseControl" or "Placemark" field. Because of this, only one course is allowed per file in the case of SIMPLE and KML formats.
Course files can seem complex, but don't let them intimidate you. Just pay attention to the JSON syntax. If you are writing your own course, use SIMPLE or SHORT format. If you are converting from KML or IOF, focus on the KML and IOF file formats. You can always manually convert an IOF or KML file into SHORT or SIMPLE format. They're just text files with a "JSON" file extension, and not very difficult to edit.
You can use the keyword "Legs" instead of "CourseControl" or "Placemark" field, no matter which file format you use.
Note the SIMPLE course is the only one with a base-level "name" keyword. This is, in fact, how the app determines if a file is in SIMPLE format. If your course is not in SIMPLE format, make sure there is no base level "name" field in it.
If your KML or other format data contains coordinates in "Longitude,Latitude" format instead of "Latitude,Longitude" order, include "LonLat":"true" at the base-level. It will make GP Loader interpret all coordinates Longitude then Latitude in order.
Setting the precision level for a course is optional, and only recommended for competitions. In all other scenarios, it is recommended to let the user pick their own precision level, by leaving the precision level out of the course data. To include precision level for a course you must use one of three numbers, -1 for high precision, 0 for normal precision, or 1 for low precision. For example "Precision":"1" would set the precision level for the course to low.
In the next sections we will cover four different examples of Orienteering courses/events. Each type of course/event is associated with a number. For example, all the #1 sample files are Classic courses, and so on. Yes, there are multiple file formats to represent the same courses. In fact, every one of the #1 course files below is for the same course. Multiple formats are presented to show that there are multiple ways to save the data, and to show the GP Loader can load a variety of files.
- #1 Classic Courses
- #2 Score-O Courses
- #3 Hybrid Courses
- #4 Multiple-Course Event Files
2.6.1 Classic Course (All #1 Examples)
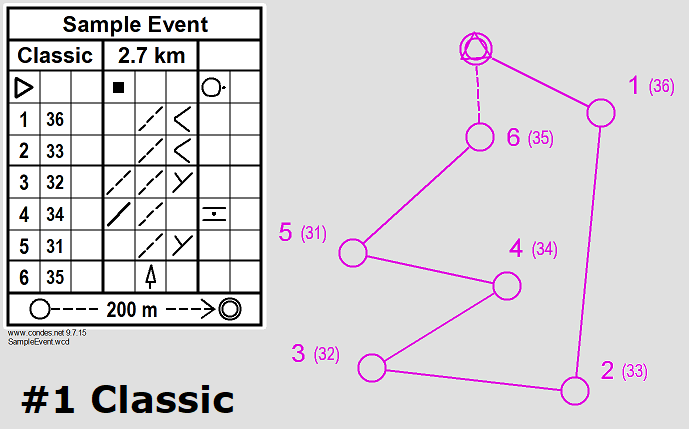
If the file does not contain a Menu, the app will begin interpreting the file as a course.
SIMPLE Format
If the course has a base-level "Name" field, the app will assume the file is in SIMPLE format. Also see OSGB/OSI/ITM Example and MGRS Example
#1 (Classic Course) SIMPLE format: https://www.landnavapp.com/samples/1-Simple.json

{
	"Name": "Classic SIMPLE",
	"CourseControl": [
		{ "Name": "START",  "Location": "38.993841,-76.894417" },
		{ "Name": "36",     "Location": "38.993103,-76.892885" },
		{ "Name": "33",     "Location": "38.988005,-76.893808" },
		{ "Name": "32",     "Location": "38.988225,-76.897995" },
		{ "Name": "34",     "Location": "38.990232,-76.892706" },
		{ "Name": "31",     "Location": "38.990121,-76.897368" },
		{ "Name": "35",     "Location": "38.992676,-76.894360" },
		{ "Name": "FINISH", "Location": "38.993841,-76.894417" }
	]
}
Note the omission of orienteering clues in this first example. It means the user will not see o-clues, but instead Lat/Lon, MGRS or no clues when navigating, depending upon the G-Punch app settings. The second example contains o-clues. Also see OSGB/OSI/ITM Example and MGRS Example
#1 (Classic Course) SIMPLE format: https://www.landnavapp.com/samples/1-Simple-Clue.json

{
	"Name": "Classic SIMPLE Clue",
	"CourseControl": [
		{ "Name": "START",  "Location": "38.993841,-76.894417", "Clue": "  ê ĉ" },
		{ "Name": "36",     "Location": "38.993103,-76.892885", "Clue": "  áĆ " },
		{ "Name": "33",     "Location": "38.988005,-76.893808", "Clue": "  áĆ " },
		{ "Name": "32",     "Location": "38.988225,-76.897995", "Clue": " ááą " },
		{ "Name": "34",     "Location": "38.990232,-76.892706", "Clue": " àá Ō" },
		{ "Name": "31",     "Location": "38.990121,-76.897368", "Clue": "  áĆ " },
		{ "Name": "35",     "Location": "38.992676,-76.894360", "Clue": "  Þ  " },
		{ "Name": "FINISH", "Location": "38.993841,-76.894417", "Clue": "  ê ĉ" }
	]
}
For more information about how to create and add orienteering clues for a course, see the Orienteering Clues section in the first half of these instructions.
SHORT Format
In SHORT format, the Point data is located in the "Control" field and the Course data is located in the "Course" and "CourseControl" fields. Also see OSGB/OSI/ITM Example and MGRS Example
#1 (Classic Course) SHORT format: https://www.landnavapp.com/samples/1-Short.json

{
	"Control": [
		{ "Name": "31",     "Location": "38.990121,-76.897368" },
		{ "Name": "32",     "Location": "38.988225,-76.897995" },
		{ "Name": "33",     "Location": "38.988005,-76.893808" },
		{ "Name": "34",     "Location": "38.990232,-76.892706" },
		{ "Name": "35",     "Location": "38.992676,-76.894360" },
		{ "Name": "36",     "Location": "38.993103,-76.892885" },
		{ "Name": "START",  "Location": "38.993841,-76.894417" },
		{ "Name": "FINISH", "Location": "38.993841,-76.894417" }
	],
	"Course": {
	 	"Name": "Classic SHORT",
		"CourseControl": [
			{ "Name": "START"  },
			{ "Name": "36"     },
			{ "Name": "33"     },
			{ "Name": "32"     },
			{ "Name": "34"     },
			{ "Name": "31"     },
			{ "Name": "35"     },
			{ "Name": "FINISH" }
		]
	}
}
Orienteering clues are omitted from the above example. If the course does not have o-clues, none will be shown during navigation, even if the user has selected "O-Clues" in the Settings.
In the below example, orienteering clues are included. If the user runs GP Loader to launch a course with o-clues, the G-Punch app will display orienteering clues no matter what the user has selected in the app settings.
If the user runs the G-Punch app again without GP Loader, it will revert back to whatever the user previously selected in the G-Punch app settings. If the original setting was "O-Clues" then it will continue to display o-clues during navigation, provided the course includes them. Also see OSGB/OSI/ITM Example and MGRS Example
#1 (Classic Course) SHORT format: https://www.landnavapp.com/samples/1-Short-Clue.json

{
	"Control": [
		{ "Id": "31",     "Location": "38.990121,-76.897368", "Clue": "  áĆ " },
		{ "Id": "32",     "Location": "38.988225,-76.897995", "Clue": " ááą " },
		{ "Id": "33",     "Location": "38.988005,-76.893808", "Clue": "  áĆ " },
		{ "Id": "34",     "Location": "38.990232,-76.892706", "Clue": " àá Ō" },
		{ "Id": "35",     "Location": "38.992676,-76.894360", "Clue": "  Þ  " },
		{ "Id": "36",     "Location": "38.993103,-76.892885", "Clue": "  áĆ " },
		{ "Id": "START",  "Location": "38.993841,-76.894417", "Clue": "  ê ĉ" },
		{ "Id": "FINISH", "Location": "38.993841,-76.894417", "Clue": "  ê ĉ" }
	],
	"Course": {
	 	"Name": "Classic SHORT Clue",
		"CourseControl": [
			{ "Control": "START"  },
			{ "Control": "36"     },
			{ "Control": "33"     },
			{ "Control": "32"     },
			{ "Control": "34"     },
			{ "Control": "31"     },
			{ "Control": "35"     },
			{ "Control": "FINISH" }
		]
	}
}
Note that in the "Course" or "Placemark" (Course data) sections, the first and last controls are always interpreted as the Start and Finish. If you were to list control #35 as the last one in the sequence, the app would treat control #35 as the Finish. In all the examples here, we have chosen to label the last control "FINISH" to keep things simple.
KML Format
In KML files there is a base-level "Folder" field, which contains a "Name" field (used for the event name, this field is ignored by GP Loader app), and a second-level "Folder" field (which has the course information). In some KML files there is even another base-level above "Folder" called "kml", but this it not required.
In KML format, the Point data and Course data is combined in the "Placemark" field. The order of the controls matter, because only one course is allowed per KML file. If you are converting from a KML file produced by another program, you may have to make additional changes, such as adding o-clues, as we've done here. Also see OSGB/OSI/ITM Example and MGRS Example
#1 (Classic Course) KML format: https://www.landnavapp.com/samples/1-KML-Clue.json

{
	"Folder": {
		"name": "KML event name (unused by GP-Loader)",
		"Folder": {
			"name": "Classic KML Clue",
			"Placemark": [
					{ "name": "START",  "Point": { "coordinates": "38.993841,-76.894417" }, "clue": "  ê ĉ" },
					{ "name": "36",     "Point": { "coordinates": "38.993103,-76.892885" }, "clue": "  áĆ " },
					{ "name": "33",     "Point": { "coordinates": "38.988005,-76.893808" }, "clue": "  áĆ " },
					{ "name": "32",     "Point": { "coordinates": "38.988225,-76.897995" }, "clue": " ááą " },
					{ "name": "34",     "Point": { "coordinates": "38.990232,-76.892706" }, "clue": " àá Ō" },
					{ "name": "31",     "Point": { "coordinates": "38.990121,-76.897368" }, "clue": "  áĆ " },
					{ "name": "35",     "Point": { "coordinates": "38.992676,-76.894360" }, "clue": "  Þ  " },
					{ "name": "FINISH", "Point": { "coordinates": "38.993841,-76.894417" }, "clue": "  ê ĉ" }
			]
		}
	}
}
Let's say you are creating a course using OpenOrienteerMap (OOM) at https://oomap.co.uk. First, you create the course, then click "KML" in the "MapRunF" section on the right side.
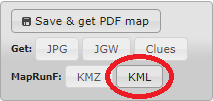
It will download a KML file, named oom_XXXXX.kml where the XXXXX is whatever MAP ID is associated with your map. First we need to convert this KML file into JSON format. So, open this KML file in an editor, and copy the contents to a KML to JSON converter webpage. The converted JSON output is shown below. The grayed out lines are unimportant. If you make no changes, this file should work fine with GP Loader, the latest edition. Also see OSGB/OSI/ITM Example and MGRS Example
#1 (Classic Course) KML format: https://www.landnavapp.com/samples/1-KML-OOM.json

{
	"kml": {
		"Document": {
			"name": "oom_new_controls", "open": "1",
			"Style": [
				{ "IconStyle": { "color": "ffff00ff", "scale": "1.8", "Icon": { "href":
					"http://maps.google.com/mapfiles/kml/paddle/wht-stars.png" }, "hotSpot": {
					"_x": "0.5", "_y": "0", "_xunits": "fraction", "_yunits": "fraction" } },
					"LabelStyle": { "color": "ffff00ff" }, "BalloonStyle": "", "ListStyle": "",
					"_id": "startfinish" },
				{ "IconStyle": { "color": "ffff00ff", "scale": "1.0", "Icon": { "href":
					"http://maps.google.com/mapfiles/kml/paddle/wht-blank.png" }, "hotSpot": {
					"_x": "0.5", "_y": "0", "_xunits": "fraction", "_yunits": "fraction" } },
					"LabelStyle": { "color": "ffff00ff", "scale": "1.0" }, "BalloonStyle": "",
					"ListStyle": "", "_id": "control" }
				],
			"Folder": {
				"name": "Controls", "open": "1",
				"Placemark": [
					{ "name": "S1", "styleUrl": "#startfinish", "Point": { "drawOrder": { "__text": "1" },
						"coordinates": "-76.89441712345678,38.99384112345678,0" } },
					{ "name": "36", "styleUrl": "#control",     "Point": { "drawOrder": { "__text": "1" },
						"coordinates": "-76.89288512345678,38.99310312345678,0" } },
					{ "name": "33", "styleUrl": "#control",     "Point": { "drawOrder": { "__text": "1" },
						"coordinates": "-76.89380812345678,38.98800512345678,0" } },
					{ "name": "32", "styleUrl": "#control",     "Point": { "drawOrder": { "__text": "1" },
						"coordinates": "-76.89799512345678,38.98822512345678,0" } },
					{ "name": "34", "styleUrl": "#control",     "Point": { "drawOrder": { "__text": "1" },
						"coordinates": "-76.89270612345678,38.99023212345678,0" } },
					{ "name": "31", "styleUrl": "#control",     "Point": { "drawOrder": { "__text": "1" },
						"coordinates": "-76.89736812345678,38.99012112345678,0" } },
					{ "name": "35", "styleUrl": "#control",     "Point": { "drawOrder": { "__text": "1" },
						"coordinates": "-76.89436012345678,38.99267612345678,0" } },
					{ "name": "F1", "styleUrl": "#startfinish", "Point": { "drawOrder": { "__text": "1" },
						"coordinates": "-76.89441712345678,38.99384112345678,0" } }
				]
			}
		},
		"_xmlns": "http://www.opengis.net/kml/2.2", "_xmlns:gx": "http://www.google.com/kml/ext/2.2",
		"_xmlns:kml": "http://www.opengis.net/kml/2.2", "_xmlns:atom": "http://www.w3.org/2005/Atom"
	}
}
Because this file is created from another program, there are a few things worth pointing out:
First, there is an extra comma and zero ",0" after the latitude in the "coordinates" field. GP Loader discards the extra second comma and zero.
Second, the default name of the course is "Controls", not "oom_new_controls" which is in a different level. Remember that the course name is in the second-level "Folder" dictionary.
Third, there is a new base field, kml. Because OOM creates this extra field, GP Loader interprets it, although it is optional and does not have to be included if you write your own KML course file..
Finally, the "coordinates" field contains Longitude before Latitude. Ordinarily this would require that you manually include a "LonLat":"true" entry at the base-level, in order for the coordinates to be properly interpreted. (See the LatLon Replacement section further down for more information.)
To make things easier when loading OpenOrienteeringMap course files, GP Loader will check for the existence of a "Style" field in the 1st "Document" or "Folder" dictionary. If it exists, like in the above example, GP Loader will assume the file was produced by OpenOrienteeringMap and it will interpret the coordinates in Longitude before Latitude order. So when you load a course created by OpenOrienteeringMap, no changes are necessary – it should load properly. Of course, you still have to add "Random" or "Score" fields if you want the course to be a Score-O course, see the #2 Score-O samples below.
If you delete this "Style" field, you will have to switch the order of the latitude and longitude, or add a "LonLat":"true" field at the base level, as described in the LatLon Replacement section further down.
IOF Format
IOF format is useful for when you have coursedata in IOF version 3.0 XML format and you need to convert it into JSON. These first samples will duplicate the previous ones, so you can compare and contrast this file with the other formats. Anything not used by GP Loader app have been grayed out to make it easier to read. Omit this data to save memory.
In IOF format, the Point data is located in the "Control" sub-field and the Course data is split in the "Course" and "CourseControl" sub-fields. Also see OSGB/OSI/ITM Example and MGRS Example
#1 (Classic Course) IOF format: https://www.landnavapp.com/samples/1-IOF.json

{
	"iofVersion": "3.0", "createTime": "2020-07-27T09:51:11", "creator": "Condes version 10.1.2",
	"Event": { "Name": "IOF Event name (unused by GP-Loader)" },
	"RaceCourseData": {
		"Control": [
			{ "Id": "START",  "Position": { "lng": "-76.894417", "lat": "38.993841" }, "type": "Start",
				"modifyTime": "2020-02-26T17:11:31", "MapPosition": { "x": "-288.56", "y": "-76.08" } },
			{ "Id": "FINISH", "Position": { "lng": "-76.894417", "lat": "38.993841" }, "type": "Finish",
				"modifyTime": "2020-02-20T17:10:16", "MapPosition": { "x": "-226.37", "y": "-114.92"} },
			{ "Id": "31",     "Position": { "lng": "-76.897368", "lat": "38.990121" }, "type":"Control",
				"modifyTime": "2020-02-27T17:12:56", "MapPosition": { "x": "-150.11", "y": "-79.77" } },
			{ "Id": "32",     "Position": { "lng": "-76.897995", "lat": "38.988225" }, "type":"Control",
				"modifyTime": "2020-02-20T17:10:48", "MapPosition": { "x": "-238.11", "y": "-160.34"} },
			{ "Id": "33",     "Position": { "lng": "-76.893808", "lat": "38.988005" }, "type":"Control",
				"modifyTime": "2020-02-20T17:11:00", "MapPosition": { "x": "-242.21", "y": "-180.75"} },
			{ "Id": "34",     "Position": { "lng": "-76.892706", "lat": "38.990232" }, "type":"Control",
				"modifyTime": "2020-02-20T17:10:20", "MapPosition": { "x": "-216.21", "y": "-152.76"} },
			{ "Id": "35",     "Position": { "lng": "-76.894360", "lat": "38.992676" }, "type":"Control",
				"modifyTime": "2020-02-27T17:10:21", "MapPosition": { "x": "-424.87", "y": "-97.81" } },
			{ "Id": "36",     "Position": { "lng": "-76.892885", "lat": "38.993103" }, "type":"Control",
				"modifyTime": "2020-02-27T17:10:33", "MapPosition": { "x": "-224.80", "y": "-184.80"} }
		],
		"Course": {
			"Name": "Classic IOF",
			"Length": "2700", "Climb": "30", "modifyTime": "2020-02-27T02:18:59",
			"CourseControl": [
				{ "type": "Start",   "Control": "START"                      },
				{ "type": "Control", "Control": "36"                         },
				{ "type": "Control", "Control": "33"                         },
				{ "type": "Control", "Control": "32"                         },
				{ "type": "Control", "Control": "34"                         },
				{ "type": "Control", "Control": "31"                         },
				{ "type": "Control", "Control": "35"                         },
				{ "type": "Finish",  "Control": "FINISH", "LegLength": "200" }
			]
		}
	}
}
Native IOF XML coursedata files include several extra lines, which are shown in gray in these examples. All these unused fields not used by GP Loader, and can be removed from the file. You do not have to delete these lines, but if your course has over 50 points, you should consider removing extra unused lines to conserve watch/app memory.
For example, you can remove all the "type", "modifyTime" and "mapPosition" fields from IOF files. Any field not listed in the above format diagrams is not interpreted by GP Loader. Fields listed with an asterisk * are optional and can be omitted or removed also.
If you do remove fields from your course file for whatever reason, upload the contents to JSONLint.com to check it for JSON syntax errors. If the course has JSON syntax errors, GP Loader will not be able to load it properly.
The below example shows what would remain of the above 1-IOF.json file if we removed all the unused lines. The file is still loadable by GP Loader because it still contains all the required fields. Also see OSGB/OSI/ITM Example and MGRS Example
#1 (Classic Course) IOF format: https://www.landnavapp.com/samples/1-IOF-Crop.json

{
	"iofVersion": "3.0",
	"RaceCourseData": {
		"Control": [
			{ "Id": "START",  "Position": { "lng": "-76.894417", "lat": "38.993841" } },
			{ "Id": "FINISH", "Position": { "lng": "-76.894417", "lat": "38.993841" } },
			{ "Id": "31",     "Position": { "lng": "-76.897368", "lat": "38.990121" } },
			{ "Id": "32",     "Position": { "lng": "-76.897995", "lat": "38.988225" } },
			{ "Id": "33",     "Position": { "lng": "-76.893808", "lat": "38.988005" } },
			{ "Id": "34",     "Position": { "lng": "-76.892706", "lat": "38.990232" } },
			{ "Id": "35",     "Position": { "lng": "-76.894360", "lat": "38.992676" } },
			{ "Id": "36",     "Position": { "lng": "-76.892885", "lat": "38.993103" } }
		],
		"Course": {
			"Name": "Classic IOF Crop",
			"CourseControl": [
				{ "Control": "START"  },
				{ "Control": "36"     },
				{ "Control": "33"     },
				{ "Control": "32"     },
				{ "Control": "34"     },
				{ "Control": "31"     },
				{ "Control": "35"     },
				{ "Control": "FINISH" }
			]
		}
	}
}
In the below example we've replaced several of the above terms with abbreviations and alternate terms. These abbreviations save memory because the file contains less characters. As indicated in the format diagram, the term "Position" can be replaced by "L" (for location), "Control" can be replaced with "C", and "Clue" can be replaced with "A". Note that the keyword "Control" field (in the "RaceCourseData" field in IOF files) cannot be abbreviated, but "CourseControl" can be replaced with "Legs" as shown below. (O-clues also added) Also see OSGB/OSI/ITM Example and MGRS Example
#1 (Classic Course) IOF format: https://www.landnavapp.com/samples/1-IOF-Clue-Abr.json

{
	"iofVersion": "3.0",
	"RaceCourseData": {
		"Control": [
			{ "C": "31",     "L": { "lng": "-76.897368", "lat": "38.990121" }, "A": "  áĆ " },
			{ "C": "32",     "L": { "lng": "-76.897995", "lat": "38.988225" }, "A": " ááą " },
			{ "C": "33",     "L": { "lng": "-76.893808", "lat": "38.988005" }, "A": "  áĆ " },
			{ "C": "34",     "L": { "lng": "-76.892706", "lat": "38.990232" }, "A": " àá Ō" },
			{ "C": "35",     "L": { "lng": "-76.894360", "lat": "38.992676" }, "A": "  Þ  " },
			{ "C": "36",     "L": { "lng": "-76.892885", "lat": "38.993103" }, "A": "  áĆ " },
			{ "C": "START",  "L": { "lng": "-76.894417", "lat": "38.993841" }, "A": "  ê ĉ" },
			{ "C": "FINISH", "L": { "lng": "-76.894417", "lat": "38.993841" }, "A": "  ê ĉ" }
		],
		"Course": {
			"Name": "Classic IOF Abr",
			"Legs": [
				{ "C": "START"  },
				{ "C": "36"     },
				{ "C": "33"     },
				{ "C": "32"     },
				{ "C": "34"     },
				{ "C": "31"     },
				{ "C": "35"     },
				{ "C": "FINISH" }
			]
		}
	}
}
You can also replace "Id" with "C" in the "Control" [array], as well as "Clue" with "A", "Time" with "T", "Score" with "S", and "RandomOrder" with "Random" or "R". You cannot abbreviate "true" or "false".
By removing the "iofVersion" and "RaceCourseData" fields (and its closing brace), we are left with base-level "Control" and "Course" fields. The file is now in SHORT format, and GP loader can still load it. Also see OSGB/OSI/ITM Example and MGRS Example
#1 (Classic Course) SHORT format: https://www.landnavapp.com/samples/1-SHORT-Clue-Abr.json

{
	"Control": [
		{ "C": "31",     "L": { "lng": "-76.897368", "lat": "38.990121" }, "A": "  áĆ " },
		{ "C": "32",     "L": { "lng": "-76.897995", "lat": "38.988225" }, "A": " ááą " },
		{ "C": "33",     "L": { "lng": "-76.893808", "lat": "38.988005" }, "A": "  áĆ " },
		{ "C": "34",     "L": { "lng": "-76.892706", "lat": "38.990232" }, "A": " àá Ō" },
		{ "C": "35",     "L": { "lng": "-76.894360", "lat": "38.992676" }, "A": "  Þ  " },
		{ "C": "36",     "L": { "lng": "-76.892885", "lat": "38.993103" }, "A": "  áĆ " },
		{ "C": "START",  "L": { "lng": "-76.894417", "lat": "38.993841" }, "A": "  ê ĉ" },
		{ "C": "FINISH", "L": { "lng": "-76.894417", "lat": "38.993841" }, "A": "  ê ĉ" }
	],
	"Course": {
		"Name": "Classic SHORT Abr",
		"Legs": [
			{ "C": "START"  },
			{ "C": "36"     },
			{ "C": "33"     },
			{ "C": "32"     },
			{ "C": "34"     },
			{ "C": "31"     },
			{ "C": "35"     },
			{ "C": "FINISH" }
		]
	}
}
Again note that the top field "Control" field (at base level in the above example) cannot be abbreviated.
If you make large structural changes to a course file, be sure to check the file for proper json syntax using JSONLint.com. The app will not be able to read your file if there is a syntax error.
Keyword terms must be spelled consistently within the whole file, and switching between abbreviations and whole words within the same structure is not allowed.
For example, if there was a lowercase "c" in the below "CourseControl" [array], it would produce an error during load, because this lowercase "c" is different from the uppercase "C" entries elsewhere in the file, in the "CourseControl" [array]. The error is highlighted below.
Similarly, an error will occur if we leave out the "Clue" fields in one of the control dictionaries, like in the below example for the "FINISH" control. Such an error may cause problems while navigating, so be sure to double-check the keywords and syntax are correct before running the course! Also see OSGB/OSI/ITM Example and MGRS Example
#1 (Classic Course) SHORT format: https://www.landnavapp.com/samples/1-SHORT-Clue-Error.json

{
	"Note": "This file contains two errors and will result in an error. See instructions.",
	"Control": [
		{ "C": "31",     "L": "38.990121,-76.897368", "Clue": "  áĆ " },
		{ "C": "32",     "L": "38.988225,-76.897995", "Clue": " ááą " },
		{ "C": "33",     "L": "38.988005,-76.893808", "Clue": "  áĆ " },
		{ "C": "34",     "L": "38.990232,-76.892706", "Clue": " àá Ō" },
		{ "C": "35",     "L": "38.992676,-76.894360", "Clue": "  Þ  " },
		{ "C": "36",     "L": "38.993103,-76.892885", "Clue": "  áĆ " },
		{ "C": "START",  "L": "38.993841,-76.894417", "Clue": "  ê ĉ" },
		{ "C": "FINISH", "L": "38.993841,-76.894417" }
	],
	"Course": {
	 	"Name": "Classic SHORT Error",
		"CourseControl": [
			{ "C": "START"  },
			{ "C": "36"     },
			{ "C": "33"     },
			{ "C": "32"     },
			{ "C": "34"     },
			{ "C": "31"     },
			{ "c": "35"     },
			{ "C": "FINISH" }
		]
	}
}
2.6.2 Score-O Course (All #2 Examples)
SIMPLE Format
If the course has a base-level "Name" field, the app will assume the file is in SIMPLE format. Also see OSGB/OSI/ITM Example and MGRS Example
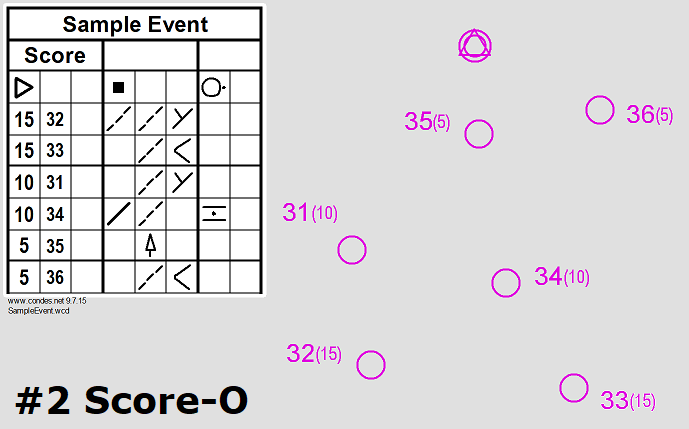
#2 (Score-O Course) SIMPLE format: https://www.landnavapp.com/samples/2-Simple-Clue.json

{
	"Name": "2 Score-O SIMPLE Clue", "Time": "60", "Score": "10", "Random": "true",
	"CourseControl": [
		{ "Name": "START",  "Location": "38.993841,-76.894417", "Clue": "  ê ĉ"                },
		{ "Name": "31",     "Location": "38.990121,-76.897368", "Clue": "  áĆ ", "Score": "10" },
		{ "Name": "32",     "Location": "38.988225,-76.897995", "Clue": " ááą ", "Score": "15" },
		{ "Name": "33",     "Location": "38.988005,-76.893808", "Clue": "  áĆ ", "Score": "15" },
		{ "Name": "34",     "Location": "38.990232,-76.892706", "Clue": " àá Ō", "Score": "10" },
		{ "Name": "35",     "Location": "38.992676,-76.894360", "Clue": "  Þ  ", "Score": "5"  },
		{ "Name": "36",     "Location": "38.993103,-76.892885", "Clue": "  áĆ ", "Score": "5"  },
		{ "Name": "FINISH", "Location": "38.993841,-76.894417", "Clue": "  ê ĉ"                }
	]
}
The "RandomOrder" field means that controls can be visited in any order, with the exception of the start/first and last/finish controls. The "Time" field gives users 60 minutes to complete the course, or they will incur a penalty for each minute late. The "Score" field means that the per-minute-late penalty is 10 points, and it also sets the default score value for each control to 10 points. Because of this, the "Score" entries for controls 31 and 34 are redundant, because they are also 10 points.
KML Format
In the below KML file we have added "Time", "Score", "Random" and "Clue" entries, since they weren't included with the original KML file. Also see OSGB/OSI/ITM Example and MGRS Example
#2 (Score-O Course) KML format: https://www.landnavapp.com/samples/2-KML-Clue.json

{
	"Folder": {
		"name": "KML event name (unused by GP-Loader)",
		"Folder": {
			"name": "Score-O KML Clue", "Time": "60", "Score": "10", "Random": "true",
			"Placemark": [
				{ "name": "START",  "Point": { "coordinates": "38.993841,-76.894417" },
						"Clue": "  ê ĉ"                },
				{ "name": "36",     "Point": { "coordinates": "38.993103,-76.892885" },
						"Clue": "  áĆ ", "Score": "5"  },
				{ "name": "33",     "Point": { "coordinates": "38.988005,-76.893808" },
						"Clue": "  áĆ ", "Score": "15" },
				{ "name": "32",     "Point": { "coordinates": "38.988225,-76.897995" },
						"Clue": " ááą ", "Score": "15" },
				{ "name": "34",     "Point": { "coordinates": "38.990232,-76.892706" },
						"Clue": " àá Ō", "Score": "10" },
				{ "name": "31",     "Point": { "coordinates": "38.990121,-76.897368" },
						"Clue": "  áĆ ", "Score": "10" },
				{ "name": "35",     "Point": { "coordinates": "38.992676,-76.894360" },
						"Clue": "  Þ  ", "Score": "5"  },
				{ "name": "FINISH", "Point": { "coordinates": "38.993841,-76.894417" },
						"Clue": "  ê ĉ"                }
			]
		}
	}
}
When converting from KML files for MapRun for particular event types, you may need to add some extra fields into the file, because GP Loader does not interpret the filename like MapRun does. For instance, if you were converting a MapRun KML file to JSON, and your course was a "Scatter" (Score) type event (PXAS), you would need to add in "Random":"true", to ensure all controls are random order, like in the above SIMPLE and SHORT examples. Also see OSGB/OSI/ITM Example and MGRS Example
SHORT Format
#2 (Score-O Course) SHORT format: https://www.landnavapp.com/samples/2-SHORT-Clue.json

{
	"Control": [
		{ "C": "31",     "L": "38.990121,-76.897368", "A": "  áĆ " },
		{ "C": "32",     "L": "38.988225,-76.897995", "A": " ááą " },
		{ "C": "33",     "L": "38.988005,-76.893808", "A": "  áĆ " },
		{ "C": "34",     "L": "38.990232,-76.892706", "A": " àá Ō" },
		{ "C": "35",     "L": "38.992676,-76.894360", "A": "  Þ  " },
		{ "C": "36",     "L": "38.993103,-76.892885", "A": "  áĆ " },
		{ "C": "START",  "L": "38.993841,-76.894417", "A": "  ê ĉ" },
		{ "C": "FINISH", "L": "38.993841,-76.894417", "A": "  ê ĉ" }
	],
	"Course": {
		"Name": "Score-O SHORT Clue", "Time": "60", "Score": "10", "Random": "true",
		"CourseControl": [
			{ "C": "START"            },
			{ "C": "31",    "S": "10" },
			{ "C": "32",    "S": "15" },
			{ "C": "33",    "S": "15" },
			{ "C": "34",    "S": "10" },
			{ "C": "35",    "S": "5"  },
			{ "C": "36",    "S": "5"  },
			{ "C": "FINISH"           }
		]
	}
}
In the below IOF file we have added "Clue", "Time", and "Score" entries, because they didn't come with the original IOF file. Also note that the native IOF format uses "randomOrder" instead of "Random", but will still work if you change it to "Random". Also see OSGB/OSI/ITM Example and MGRS Example
IOF Format
#2 (Score-O Course) IOF format: https://www.landnavapp.com/samples/2-IOF-Clue.json

{
	"iofVersion": "3.0", "createTime": "2020-07-27T09:51:11", "creator": "Condes version 10.1.2",
	"Event": { "Name": "IOF Event name (unused by GP-Loader)" },
	"RaceCourseData": {
		"Control": [
			{ "Id": "START",  "Position": { "lng": "-76.894417", "lat": "38.993841" }, "Clue": "  ê ĉ",
				"type": "Start",   "modifyTime": "2020-02-26T17:11:31", "MapPosition": {"x":"unused"} },
			{ "Id": "FINISH", "Position": { "lng": "-76.894417", "lat": "38.993841" }, "Clue": "  ê ĉ",
				"type": "Finish",  "modifyTime": "2020-02-20T17:10:16", "MapPosition": {"x":"unused"} },
			{ "Id": "31",     "Position": { "lng": "-76.897368", "lat": "38.990121" }, "Clue": "  áĆ ",
				"type": "Control", "modifyTime": "2020-02-27T17:12:56", "MapPosition": {"x":"unused"} },
			{ "Id": "32",     "Position": { "lng": "-76.897995", "lat": "38.988225" }, "Clue": " ááą ",
				"type": "Control", "modifyTime": "2020-02-20T17:10:48", "MapPosition": {"x":"unused"} },
			{ "Id": "33",     "Position": { "lng": "-76.893808", "lat": "38.988005" }, "Clue": "  áĆ ",
				"type": "Control", "modifyTime": "2020-02-20T17:11:00", "MapPosition": {"x":"unused"} },
			{ "Id": "34",     "Position": { "lng": "-76.892706", "lat": "38.990232" }, "Clue": " àá Ō",
				"type": "Control", "modifyTime": "2020-02-20T17:10:20", "MapPosition": {"x":"unused"} },
			{ "Id": "35",     "Position": { "lng": "-76.894360", "lat": "38.992676" }, "Clue": "  Þ  ",
				"type": "Control", "modifyTime": "2020-02-27T17:10:21", "MapPosition": {"x":"unused"} },
			{ "Id": "36",     "Position": { "lng": "-76.892885", "lat": "38.993103" }, "Clue": "  áĆ ",
				"type": "Control", "modifyTime": "2020-02-27T17:10:33", "MapPosition": {"x":"unused"} }
		],
		"Course": {
			"Name": "Score-O IOF Clue", "Time": "60", "Score": "10",
			"Length": "2700", "Climb": "30", "modifyTime": "2020-02-27T02:18:59",
			"CourseControl": [
				{ "type": "Start",                          "Control": "START"                 },
				{ "type": "Control", "randomOrder": "true", "Control": "31",    "Score": "10"  },
				{ "type": "Control", "randomOrder": "true", "Control": "32",    "Score": "15"  },
				{ "type": "Control", "randomOrder": "true", "Control": "33",    "Score": "15"  },
				{ "type": "Control", "randomOrder": "true", "Control": "34",    "Score": "10"  },
				{ "type": "Control", "randomOrder": "true", "Control": "35",    "Score": "5"   },
				{ "type": "Control", "randomOrder": "true", "Control": "36",    "Score": "5"   },
				{ "type": "Finish",                         "Control": "FINISH"                }
			]
		}
	}
}
As an alternative, we could have replaced the above six "randomOrder" entries with a single "Random":"true" entry on the same line as the course "Name".
In the SHORT and IOF format "Control" sections (like in the Point Data section of the G-Punch app settings) the controls can appear in any order, and you can also include extra dummy controls here.
2.6.3 Hybrid/Combo Courses (All #3 Examples)
Hybrid courses contain both classic/ordered controls, and score/unordered controls.
If the fields "Random" and "Score" are included in individual control {dictionaries} rather than in the overall course [array], it means those modifiers apply to individual control(s) rather than the entire course.
In these Hybrid courses (because they contains classic/ordered along with score/unordered controls), after the user punches the START, they must move to control 35. They can go to 31, 32, 33, 34, and 36 in any order, then they must return to control 35 again, before punching the FINISH. Also see OSGB/OSI/ITM Example and MGRS Example
SIMPLE Format
#3 (Hybrid Course) SIMPLE format: https://www.landnavapp.com/samples/3-SIMPLE.json

{
	"Name": "Hybrid SIMPLE", "Time": "60", "Score": "10", "Random": "true",
	"Points": [
		{ "Name": "START",  "Location": "38.993841,-76.894417"                         },
		{ "Name": "35",     "Location": "38.992676,-76.894360", "R": "false", "S": "0" },
		{ "Name": "31",     "Location": "38.990121,-76.897368"                         },
		{ "Name": "32",     "Location": "38.988225,-76.897995"                         },
		{ "Name": "33",     "Location": "38.988005,-76.893808"                         },
		{ "Name": "34",     "Location": "38.990232,-76.892706"                         },
		{ "Name": "36",     "Location": "38.993103,-76.892885"                         },
		{ "Name": "35",     "Location": "38.992676,-76.894360", "R": "false", "S": "0" },
		{ "Name": "FINISH", "Location": "38.993841,-76.894417"                         }
	]
}
Although this SIMPLE course works with the GP Loader and G-Punch apps, for hybrid courses like this one, it is recommended to use SHORT format for Hybrid courses, because it lists out the controls and course(s) in two [arrays]. Also see OSGB/OSI/ITM Example and MGRS Example
#3 (Hybrid Course) SHORT format: https://www.landnavapp.com/samples/3-SHORT-Clue.json

{
	"Control": [
		{ "C": "START",  "L": "38.993841, -76.894417", "A": "  ê ĉ" },
		{ "C": "FINISH", "L": "38.993841, -76.894417", "A": "  ê ĉ" },
		{ "C": "31",     "L": "38.990121, -76.897368", "A": "  áĆ " },
		{ "C": "32",     "L": "38.988225, -76.897995", "A": " ááą " },
		{ "C": "33",     "L": "38.988005, -76.893808", "A": "  áĆ " },
		{ "C": "34",     "L": "38.990232, -76.892706", "A": " àá Ō" },
		{ "C": "35",     "L": "38.992676, -76.894360", "A": "  Þ  " },
		{ "C": "36",     "L": "38.993103, -76.892885", "A": "  áĆ " }
	],
	"Course": {
		"Name": "Hybrid SHORT",
		"Legs": [
			{ "C": "START"                      },
			{ "C": "35", "R": "false", "S": "0" },
			{ "C": "31"                         },
			{ "C": "32"                         },
			{ "C": "33"                         },
			{ "C": "34"                         },
			{ "C": "36"                         },
			{ "C": "35", "R": "false", "S": "0" },
			{ "C": "FINISH"                     }
		]
	}
}
G-Punch app will always consider the first and last controls as classic/ordered controls, even if we set them to score/unordered in the coursedata. This is because in the "CourseControl" or "Legs" field, the first and last controls are always interpreted to be the Start and Finish controls.
2.6.4 Extra/Dummy Controls
SHORT and IOF format is required when course designers want to include extra/dummy controls.
As an example, control # 55 (highlighted below) has been added to the "Control" [array], and will be discoverable by the user while they run this course. But the user will not need to navigate to or punch control # 55 in order to complete the course, because it is not included in the "CourseControl" [array] – it is an extra dummy control. Also see OSGB/OSI/ITM Example and MGRS Example
#1 (Classic Course) IOF format: https://www.landnavapp.com/samples/1-IOF-Clue-Extra.json

{
	"iofVersion": "3.0",
	"RaceCourseData": {
		"Control": [
			{ "Id": "START",  "Position": { "lng": "-76.894417", "lat": "38.993841" }, "clue": "  ê ĉ" },
			{ "Id": "FINISH", "Position": { "lng": "-76.894417", "lat": "38.993841" }, "clue": "  ê ĉ" },
			{ "Id": "31",     "Position": { "lng": "-76.897368", "lat": "38.990121" }, "clue": "  áĆ " },
			{ "Id": "32",     "Position": { "lng": "-76.897995", "lat": "38.988225" }, "clue": " ááą " },
			{ "Id": "33",     "Position": { "lng": "-76.893808", "lat": "38.988005" }, "clue": "  áĆ " },
			{ "Id": "34",     "Position": { "lng": "-76.892706", "lat": "38.990232" }, "clue": " àá Ō" },
			{ "Id": "35",     "Position": { "lng": "-76.894360", "lat": "38.992676" }, "clue": "  Þ  " },
			{ "Id": "55",     "Position": { "lng": "-76.893844", "lat": "38.994162" }, "clue": "  áĆ " },
			{ "Id": "36",     "Position": { "lng": "-76.892885", "lat": "38.993103" }, "clue": "  áĆ " }
		],
		"Course": {
			"Name": "Classic IOF Extra",
			"CourseControl": [
				{ "Control": "START"  },
				{ "Control": "36"     },
				{ "Control": "33"     },
				{ "Control": "32"     },
				{ "Control": "34"     },
				{ "Control": "31"     },
				{ "Control": "35"     },
				{ "Control": "FINISH" }
			]
		}
	}
}
This is the same course in SHORT format. Also see OSGB/OSI/ITM Example and MGRS Example
#1 (Classic Course) SHORT format: https://www.landnavapp.com/samples/1-SHORT-Clue-Extra.json

{
	"Control": [
		{ "Id": "START",  "Position": { "lng": "-76.894417", "lat": "38.993841" }, "clue": "  ê ĉ" },
		{ "Id": "FINISH", "Position": { "lng": "-76.894417", "lat": "38.993841" }, "clue": "  ê ĉ" },
		{ "Id": "31",     "Position": { "lng": "-76.897368", "lat": "38.990121" }, "clue": "  áĆ " },
		{ "Id": "32",     "Position": { "lng": "-76.897995", "lat": "38.988225" }, "clue": " ááą " },
		{ "Id": "33",     "Position": { "lng": "-76.893808", "lat": "38.988005" }, "clue": "  áĆ " },
		{ "Id": "34",     "Position": { "lng": "-76.892706", "lat": "38.990232" }, "clue": " àá Ō" },
		{ "Id": "35",     "Position": { "lng": "-76.894360", "lat": "38.992676" }, "clue": "  Þ  " },
		{ "Id": "55",     "Position": { "lng": "-76.893844", "lat": "38.994162" }, "clue": "  áĆ " },
		{ "Id": "36",     "Position": { "lng": "-76.892885", "lat": "38.993103" }, "clue": "  áĆ " }
	],
	"Course": {
		"Name": "Classic SHORT Extra",
		"CourseControl": [
			{ "Control": "START"  },
			{ "Control": "36"     },
			{ "Control": "33"     },
			{ "Control": "32"     },
			{ "Control": "34"     },
			{ "Control": "31"     },
			{ "Control": "35"     },
			{ "Control": "FINISH" }
		]
	}
}
2.6.5 LatLon Replacement
Let's say your Location field is a single text block that contains the latitude and longitude data separated by a comma. If you accidentally enter the longitude before the latitude (it should be latitude followed by longitude), GP Loader may see no problem, and send the data to G-Punch Orienteering app. It will result in your points being nowhere near where they should be. In order to fix this, rather than having to go through and edit every one, simply add a "LonLat":"true" field at the base level of the file, and GP Loader will switch the order. Note: This does NOT apply to the loading of OSGB/OSI/ITM or MGRS data, for example see OSGB/OSI/ITM Example and MGRS Example
#1 (Classic Course) IOF format: https://www.landnavapp.com/samples/1-IOF-Clue-LonLat.json

{
	"LonLat": "true",
	"iofVersion": "3.0",
	"RaceCourseData": {
		"Control": [
			{ "C": "START",  "L": "-76.894417, 38.993841", "A": "  ê ĉ" },
			{ "C": "FINISH", "L": "-76.894417, 38.993841", "A": "  ê ĉ" },
			{ "C": "31",     "L": "-76.897368, 38.990121", "A": "  áĆ " },
			{ "C": "32",     "L": "-76.897995, 38.988225", "A": " ááą " },
			{ "C": "33",     "L": "-76.893808, 38.988005", "A": "  áĆ " },
			{ "C": "34",     "L": "-76.892706, 38.990232", "A": " àá Ō" },
			{ "C": "35",     "L": "-76.894360, 38.992676", "A": "  Þ  " },
			{ "C": "36",     "L": "-76.892885, 38.993103", "A": "  áĆ " }
		],
		"Course": {
			"Name": "Classic IOF LonLat",
			"Legs": [
				{ "C": "START"  },
				{ "C": "36"     },
				{ "C": "33"     },
				{ "C": "32"     },
				{ "C": "34"     },
				{ "C": "31"     },
				{ "C": "35"     },
				{ "C": "FINISH" }
			]
		}
	}
}
This is the same course in SHORT format. Also see OSGB/OSI/ITM Example and MGRS Example
#1 (Classic Course) SHORT format: https://www.landnavapp.com/samples/1-SHORT-Clue-LonLat.json

{
	"LonLat": "true",
	"Control": [
		{ "C": "START",  "L": "-76.894417, 38.993841", "A": "  ê ĉ" },
		{ "C": "FINISH", "L": "-76.894417, 38.993841", "A": "  ê ĉ" },
		{ "C": "31",     "L": "-76.897368, 38.990121", "A": "  áĆ " },
		{ "C": "32",     "L": "-76.897995, 38.988225", "A": " ááą " },
		{ "C": "33",     "L": "-76.893808, 38.988005", "A": "  áĆ " },
		{ "C": "34",     "L": "-76.892706, 38.990232", "A": " àá Ō" },
		{ "C": "35",     "L": "-76.894360, 38.992676", "A": "  Þ  " },
		{ "C": "36",     "L": "-76.892885, 38.993103", "A": "  áĆ " }
	],
	"Course": {
		"Name": "Classic SHORT LonLat",
		"Legs": [
			{ "C": "START"  },
			{ "C": "36"     },
			{ "C": "33"     },
			{ "C": "32"     },
			{ "C": "34"     },
			{ "C": "31"     },
			{ "C": "35"     },
			{ "C": "FINISH" }
		]
	}
}
2.6.6 Multi-Course Events
The "Course" entry is now an [array] and not a {dictionary}, and in the [array] are multiple course {dictionaries}. Also see OSGB/OSI/ITM Example and MGRS Example
#4 (Multi-Course) IOF format: https://www.landnavapp.com/samples/4-IOF-Clue.json

{
	"iofVersion": "3.0",
	"RaceCourseData": {
		"Control": [
			{ "Id": "START",  "Position": { "lng": "-76.894417", "lat": "38.993841" }, "clue": "  ê ĉ" },
			{ "Id": "FINISH", "Position": { "lng": "-76.894417", "lat": "38.993841" }, "clue": "  ê ĉ" },
			{ "Id": "31",     "Position": { "lng": "-76.897368", "lat": "38.990121" }, "clue": "  áĆ " },
			{ "Id": "32",     "Position": { "lng": "-76.897995", "lat": "38.988225" }, "clue": " ááą " },
			{ "Id": "33",     "Position": { "lng": "-76.893808", "lat": "38.988005" }, "clue": "  áĆ " },
			{ "Id": "34",     "Position": { "lng": "-76.892706", "lat": "38.990232" }, "clue": " àá Ō" },
			{ "Id": "35",     "Position": { "lng": "-76.894360", "lat": "38.992676" }, "clue": "  Þ  " },
			{ "Id": "55",     "Position": { "lng": "-76.893844", "lat": "38.994162" }, "clue": "  áĆ " },
			{ "Id": "36",     "Position": { "lng": "-76.892885", "lat": "38.993103" }, "clue": "  áĆ " }
		],
		"Course": [
			{	"Name": "M-Classic IOF",
				"CourseControl": [
					{ "Control": "START"  },
					{ "Control": "36"     },
					{ "Control": "33"     },
					{ "Control": "32"     },
					{ "Control": "34"     },
					{ "Control": "31"     },
					{ "Control": "35"     },
					{ "Control": "FINISH" }
				]
			},
			{	"Name": "M-Score-O IOF", "Time": "60", "Score": "10", "randomOrder": "true",
				"CourseControl": [
					{ "Control": "START"                },
					{ "Control": "31",    "score": "10" },
					{ "Control": "32",    "score": "15" },
					{ "Control": "33",    "score": "15" },
					{ "Control": "34",    "score": "10" },
					{ "Control": "35",    "score": "5"  },
					{ "Control": "36",    "score": "5"  },
					{ "Control": "FINISH"               }
				]
			},
			{	"Name": "M-Hybrid IOF", "Time": "60", "Score": "10", "randomOrder": "true",
				"CourseControl": [
					{ "Control": "START"                                    },
					{ "Control": "35", "randomOrder": "false", "score": "0" },
					{ "Control": "31"                                       },
					{ "Control": "32"                                       },
					{ "Control": "33"                                       },
					{ "Control": "34"                                       },
					{ "Control": "36"                                       },
					{ "Control": "35", "randomOrder": "false", "score": "0" },
					{ "Control": "FINISH"                                   }
				]
			},
			{	"Name": "M-Butterfly IOF", "Time": "180", "Score": "0",
				"CourseControl": [
					{ "Control": "START"  },
					{ "Control": "35"     },
					{ "Control": "32"     },
					{ "Control": "36"     },
					{ "Control": "35"     },
					{ "Control": "33"     },
					{ "Control": "34"     },
					{ "Control": "35"     },
					{ "Control": "FINISH" }
				]
			}
		]
	}
}
When the app runs this IOF coursedata file, it will present the user with a menu of courses to pick from: "M-Classic IOF", "M-Score-O IOF", "M-Hybrid IOF" or "M-Butterfly IOF". After the user selects one of the course options, the app loads that course into the G-Punch Orienteering app.
During navigation the user will be able to discover extra or dummy controls that were included in the "Control" [array], like control # 55 in this example.
Below is the SHORT format multiple course file, for use in events that share common controls. Note that the "Course" entry is now an [array] and not a {dictionary}, and in the [array] are multiple course {dictionaries}.
When the app runs this SHORT coursedata file, it will present the user with a menu of courses to pick from: "M-Classic SHORT", "M-Score-O SHORT", "M-Hybrid SHORT" or "M-Butterfly SHORT". After the user selects one of the course options, the app loads it into the G-Punch Orienteering app. Also see OSGB/OSI/ITM Example and MGRS Example
#4 (Multi-Course) SHORT format: https://www.landnavapp.com/samples/4-SHORT-Clue.json

{
	"Control": [
		{ "C": "31",     "L": "38.990121,-76.897368", "A": "  áĆ " },
		{ "C": "32",     "L": "38.988225,-76.897995", "A": " ááą " },
		{ "C": "33",     "L": "38.988005,-76.893808", "A": "  áĆ " },
		{ "C": "34",     "L": "38.990232,-76.892706", "A": " àá Ō" },
		{ "C": "35",     "L": "38.992676,-76.894360", "A": "  Þ  " },
		{ "C": "36",     "L": "38.993103,-76.892885", "A": "  áĆ " },
		{ "C": "START",  "L": "38.993841,-76.894417", "A": "  ê ĉ" },
		{ "C": "FINISH", "L": "38.993841,-76.894417", "A": "  ê ĉ" }
	],
	"Course": [
		{	"Name": "M-Classic SHORT", "Hint":"100",
			"CourseControl": [
				{ "C": "START"  },
				{ "C": "36"     },
				{ "C": "33"     },
				{ "C": "32"     },
				{ "C": "34"     },
				{ "C": "31"     },
				{ "C": "35"     },
				{ "C": "FINISH" }
			]
		},
		{	"Name": "M-Score-O SHORT", "Time": "60", "Score": "10", "RandomOrder": "true",
			"CourseControl": [
				{ "C": "START"            },
				{ "C": "31",    "S": "10" },
				{ "C": "32",    "S": "15" },
				{ "C": "33",    "S": "15" },
				{ "C": "34",    "S": "10" },
				{ "C": "35",    "S": "5"  },
				{ "C": "36",    "S": "5"  },
				{ "C": "FINISH"           }
			]
		},
		{	"Name": "M-Hybrid SHORT", "Time": "60", "Score": "10", "RandomOrder": "true",
			"CourseControl": [
				{ "C": "START"                         },
				{ "C": "35",    "R": "false", "S": "0" },
				{ "C": "31"                            },
				{ "C": "32"                            },
				{ "C": "33"                            },
				{ "C": "34"                            },
				{ "C": "36"                            },
				{ "C": "35",    "R": "false", "S": "0" },
				{ "C": "FINISH"                        }
			]
		},
		{	"Name": "M-Butterfly SHORT", "Time": "180", "Score": "0",
			"CourseControl": [
				{ "C": "START"  },
				{ "C": "35"     },
				{ "C": "32"     },
				{ "C": "36"     },
				{ "C": "35"     },
				{ "C": "33"     },
				{ "C": "34"     },
				{ "C": "35"     },
				{ "C": "FINISH" }
			]
		}
	]
}
The first course in this example contains the field "Hint":"100". When the user's next leg is under 100 meters distance, rather than showing the regular clue, it will show the distance and direction to the next control (including declination adjustments if the user entered a declination into the G-Punch settings). If the user presses START/STOP the display will return to its regular view. More information about this feature is below.
2.7 Distance & Direction Option
Sometimes people prefer to view the distance and direction from the last control to the next control. Course designers can use this feature to help quickly move competitors away from a particularly difficult-to-find control, or the control at the end of a long leg. For example, lets say leg 3 (control 122 to control 123) is 730 m long, and leg 4 (control 123 to control 124) is 75 m long. To prevent participants from gathering together at control 123 while they figure out where to go next, the course designer can provide participants with this information up front, so they can quickly move out and away from control 123.
The app will allow any legs under a certain length (up to 100m) to display distance and (declinated) direction hint in addition to regular clues. The distance and direction hint is only enabled in the following conditions:
- The course must be loaded from GP Loader; reloading or loading from G-Punch settings will disable it
- It must be an ordered-control "Classic" course in its entirety
- The course designer has to include a "hint":"80" (or a different distance) in the course section
- The maximum leg distance allowed for a hint is 100 meters
- If the hint is displayed, results will be NC-noncompetitive since the hint was calculated by the app
Unfortunately, "Hint" option is ONLY available through courses launched via GP Loader.
To demonstrate the functionality of the "Hint" Option, include it in the Course info, as shown in the "M-Classic SHORT" course, in the last sample file, above.
2.8 Troubleshooting Courses
Confirm the URL for your coursefile is correct in the GP Loader app settings. Check that the URLs in Menu files are correctly spelled. Some spaces ( ) are allowed in URLs, but for best results minimize their usage because they are loaded differently. For non-local servers, Garmin requires that the website support HTTPS security. In other words, the URL must begin with https:// and not http:// , unless you're accessing it on a local server. To use a local server without HTTPS, see the next section. For further assistance in this area, click the "contact developer" link on the Garmin app store page. Thanks to David P for this advice!
Paste the file into JSONLint.com and click "validate JSON" to inspect it for common JSON syntax errors.
If GP Loader has trouble loading the file, it probably has something to do with the coursedata/menu/URL. Pay particular attention to capitalization and spelling of terms in the coursedata file. Check that each Control (name) in the Course section corresponds to a Control (name) in the Control section, and that both are spelled the same way. Misspellings and/or differences in capitalization are not allowed. Check the terminology used in the coursedata file is the same throughout the file. If for one control you use (lowercase) "clue", you should use that form everywhere in the file, and using "Clue" (with a capital C) elsewhere in the same file will produce an error. For certain key terms like "Folder", "RaceCourseData", "CourseControl" or "Placemark" they must be capitalized as they appear here, and alternate versions are not accepted. See the format diagram for a list of key words.
If you can load the file into G-Punch Orienteering, but the app crashes during navigation, check the locations to ensure no two controls (other than start and finish points) are located within 50 meters of eachother, and that no point is close to the last point in the Controls section, other than the Start (which is allowed to be near the Finish).
Check the Log file to ensure the coordinates are properly loading. If you discover that the coordinates are loading in reverse order (i.e., Longitude followed by Latitude), it is an easy fix. Just add a "LonLat":"true" entry at the base level of your file. GP Loader will load the coordinates in reverse. (This only works if longitude and latitude are in a single text field; if they are separately labeled Lon and Lat, you have to manually change those labels).
If you still can't determine what's wrong, click "Contact Developer" on the Garmin App store page and explain the problem. Include your email address so the developers can send you a reply.
2.8.1 Hosting Course Files
Google Drive and Drop Box are two ways that you can easily make courses available to others. See the end of section 2.1, A Walkthrough Using Google Maps for a demonstration of posting course files on Google Drive. The remainder of the section below is dedicated to TinyWebServer.
Using TinyWebServer app, you can host and store course files on your phone, without using an external HTTPS server. This is for use with your own Garmin device and Garmin Connect app. Others will not have access to these files. You would save the course(s) to the folder on your mobile device, and rather than entering a normal URL into the GP Loader app settings, you enter the server address provided with the app (i.e., http://127.0.0.1:8080/mycourse.json').
You may find another app such as
SimpleServer which also creates a local server, if so that will work just as well. Here we will use TinyWebServer app, and it has been tested using a Garmin device paired with an Android mobile device. If you own a mobile device with iOS, the below steps may not directly apply to your situation, please contact developer if you have questions or need assistance.
Download TinyWebServer app to your mobile device, whichever device has the Garmin Connect app on it, that you use when interacting with your Garmin device.
Create a subdirectory on your mobile device to house your course files. In this example, I've called the folder 'garminserver'.
Run the TinyWebServer app, select that folder as the "server path".
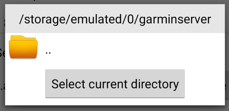
Save your course and menu files to the folder you created. Depending upon where you created the folder, you may be able to save the files directly from your email app to this folder. In this example, I've saved the 'GoogleCourse.json' file to the folder.
Open the TinyWebServer app and press "Start Server". Look at the "Server IP". It should show an address like '127.0.0.1'. If not initially try waiting some time. Look at the "Server Port". It should show '8080'.
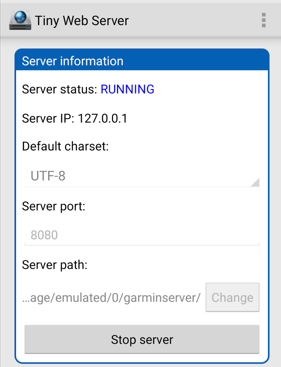
You may test if your TinyWebServer is working by opening up an internet browser on your mobile device and entering 'http://127.0.0.1:8080/GoogleCourse.json'. If your browser downloads the file then it's working, proceed with the next step.
Go into the GP Loader settings and enter the same URL 'http://127.0.0.1:8080/GoogleCourse.json'. It should load the file successfully.
If you need assistance, click "Contact Developer" on the Garmin App store page, explain the problem and include your email address so the developers can send you a reply. Thanks to Thomas M for requesting assistance on this feature!
2.9 Tips for Course Designers
When designing for virtual Orienteering, it is better to select larger features for controls (e.g., hilltop) instead of smaller ones (e.g., pit). It is also better to select features which do not border inaccessible, off-limits areas, cliffs or steep hills. This is because GPS inaccuracies may "place" the control several meters from the actual feature, such as halfway up the hill or down the cliff.
For courses with complex scoring schemas like "parity", "even-odd", "bones" events, manual calculation of results may be required. A listing of which controls the user visited is viewable in Garmin Mobile app in the "review lap" section.
During course design, if you use the internet to obtain Lat-Lon geocoordinates, you may obtain ones that look like "38.99023202651540, -76.8927068142461" with over ten digits after the decimal point. Only the first five to six digits after the decimal are important, since GPS technology itself is only precise to about that level. To save memory it is recommended to round the coordinates to a maximum of six digits after the decimal like "38.990232, -76.892707".
Use G-Punch Data Generator here to create courses from EPSG-coded IOF-XML files, thanks to Andreas T.
Use Routebuilder spreadsheet here to help you create routes, thanks to Colin B.